6.29.2008

DIY Food Dehydrator v. 2

Often the best solutions aren't sophisticated. My first dehydrator was more elaborate than it needed to be. A process improvement was in order.

A better solution would simply bathe many trays with warm, moving air at a temperature between 85°F and 140°F. I wanted to scale up the operation (stackable trays). The previous design's airflow was fast and the air several inches over the hotplate wasn't as warm as the air closest to the heat source, thus limiting the capacity. The depicted "vertical" form of heat and a gentler fan was easily achieved with a simple space heater (off season price at thrift store, $4). The fan is gentler and the heat adjustable. With the middle setting, I was able to maintain a steady 92-95°F. Click the image for a better detail view. I'm currently doing two trays and see no reason I couldn't use at least 5-7 with the proper configuration of trays (still some work on that needed).

diy_dehydrator
Click on image for larger detail view

6.23.2008

La chien a mangé ma saucisse.

le chien a mangé ma saucisse
the carnage

We're about a week and a half into the big dry curing experiment for my saucisson sec. Despite a fleeting fear that my saucisson was getting a bad mold (according to Len Poli, they're OK), things were going swimmingly.

The other day, the Mrs. and I were busily running around trying to get a bunch of stuff done. Suze was just hanging around watching us (foreshadowing - Suze usually sleeps). As we were running about, I noticed Suze was missing. I walked into the basement. Upon entering the basement, I noticed a beautiful burst of fresh-smelling sausage. Hmmm. I thought the aroma was settling down as the curing was progressing. Interesting (foreshadowing again).

I walked into the narrow, dark, humid hallway I call Sausage Curing Row and noticed, in a ray of artificial light, my dog leaning out a bit to make eye contact with me. She looked nervous. She always looks nervous. She looked a tad distressed. She always looks distressed. But, something was different. I was worried and went to see if she was alright.

She was fine. Really fine.

She smelled like garlic and I'm not sure, but I think she was smiling. Sausages were all over the floor and Suze had ravaged one of them. I rescued the poor little guys and realized only one had been violated. In the scuff, another had popped off the chain and fell in the water supplying the requisite high humidity. Suze ran away, a tad frustrated, and I scrambled to put the remaining saucisson back in the curing position with the barrier in place - that I removed that morning for some unknown reason. I managed to salvage about two thirds of the supply and left them to rest. Time will tell if we get any after another couple weeks.

6.19.2008

Pears, dehydrated and yummy

I'll be updating this post intermittently with bits of dried fruit from my nifty dehydrator. I've tweaked it a bit, but generally the same as initially disclosed. Just have to start stacking trays to do more in one run. I may have to put the hot plate so the element is vertical if I do this stacking thing.

diy dehydrator: pears
pears
Thinly sliced D'anjou pears were rinsed quickly in acidulated water and placed to dry for about 24 hours. Much more delicate than the pears in the store bought dry fruit mix.

6.18.2008

In which I become a sausagemaker (so the mrs won't be embarrassed by my former title even though my masculinity was never threatened) - updated

saucisson sec, day 1
Day 1
Finally, I have joined my brethren sausage makers. I have hunted (in Giant Eagle), cut, ground, spiced, stuffed, tied and pricked the casings. All went well until the last frigging step.

I needed to pierce the casings to let these dehydrate during their dry curing. I pierced using a knife tip. I didn't realize how much pressure these things were under, but they oozed meat in some places. I was supposed to use a pin. When I did - on some of them - things were fine. No oozing. Oh well. Only a few bucks invested. We'll see how they come out.

Now, the tough part. Waiting. Temps in the basement are a tad high, ca. 65°F and ca. 65-73%RH. They are supposed to be finished when very firm and have lost 30% of their weight from dehydration. I will be testing one several days before unleashing them on friends. A coworker told me to have him on speed dial the day I try it so I can call for help if I need it. Thanks Larry.

It's supposed to take 3-4 weeks. I'll be updating this post with progress.

Updates
saucisson sec, day 8
Day 8. Drying may be going well. The sausage is getting much more dense (losing moisture). The greenish spots on the exterior are worrying me. Although, I've never watched the intermediate steps of a dry cure before. The outer skin is getting whitish which looks consistent with other dry cured sausages I've seen. Anyone have any thoughts on the green spots? Like mold on cheese? Still have a couple more weeks and, despite the weather, we've maintained low 60's temperature and 70%RH +/-. Stay posted.

6.14.2008

DIY Fruit Dehydrator v. 1

diy food dehydrator

The other day, a coworker generously shared a piece of homemade strawberry fruit leather; it was sublime. Trader Joe's might sell these things for a quarter, but the descriptor 'leather' is apt. A well prepared nugget of dried fruit is a treat. Thanks Fred, I'm not worthy.

The light bulb went off. Scanning Ebay and Amazon for a dehydrator was my first move. Way too expensive for an initial attack. I read these devices operate at 85°F to ca. 100+°F and require a fan, presumably to wick away the moisture as the fruit dries. Seemed easy enough.

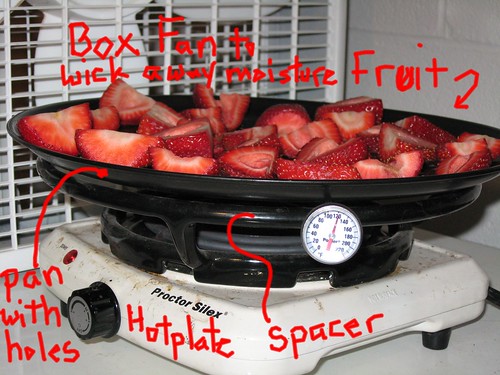
To the basement! I purchased some of those nearly tasteless California strawberries for my pilot runs and used the setup shown in the image. An inexpensive 800W hot plate on a low setting with some heat diffuser/spacer and a tray holding the fruit. I set the hotplate to get a specific surface temperature and placed a box fan beside it to drive off the moisture. Some temperature measuring devices were placed about and I was ready to evaluate parameters.

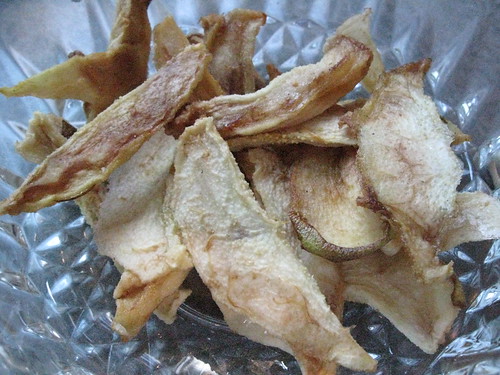
The fruit leather is an ambitious target. I'll attempt that later. For now, dried strawberries. Why not images of the final product? From two large containers of strawberries, there are none left. I'll post them later, although they don't look particularly special.*


So far, the parameters for strawberries (I'll be editing this as refinements become available):

• fruit should be cut to maximize surface area and cut uniformly (slices seem to be good).
• drying surface temperature, 85-100°F, too hot and they get dark spots
• box fan, slow speed
• drying time, ca. 24 hours, seems flexible
• for fruit that can discolor prior to dehydrating, e.g., apples, pears, etc. I've used a couple treatments. 1. a bath of lemon juice and water is the most reliable. 2. I've also used (for apples) a bath of balsamic vinegar and brown sugar. Gives the fruit an interesting flavor.
... more to come

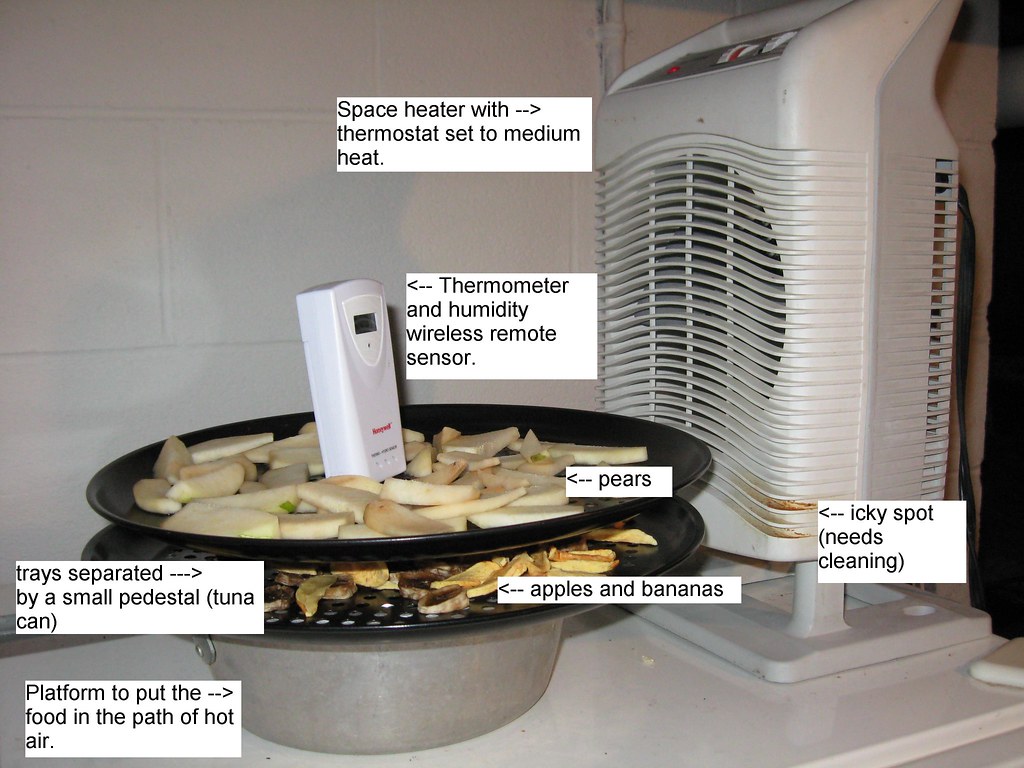
[note to self: The hot plate idea is ok, but the heat is localized on the bottom. If I wanted a vertical stack of trays, I'd need a vertical heat source with a fan, i.e., a space heater!!!, to the thrift store. 24-Jun-08: Just scored an inexpensive space heater with a large range of heat settings. I'll be trying this with a stacked set of drying trays. Results to follow.]

Related link
My new improved dehydrator. It's awesome.

*rant: I detest the phrase 'food porn' and urge this disgusting phrase be abolished from food bloggers' vernacular. I'm no prude, but even the casual association of something as special as food and porn is wrong.

6.09.2008

Scalpel ...

ready ...

Weather is wreaking havoc with my basement environmental conditions. Temps are up (63-70°F) and relative humidity is nuts (63-70+%).

I have my pork cut up, materials gathered - curing salt, nitrile gloves, etc. And, the mixer is chilled, locked and loaded. Now, I have to figure out if the low 60's/60-70%RH is adequate or too moist for the dry cure. I may just make plain old sumptuous Italian sausage if I back out of the dry cure and save that for the winter when the basement environment is more stable.

6.06.2008

Vegetarian BBQ: Roasted* Medley on Greens

IMG_0871

A while back, the amazing Jim of CMH Gourmand asked me during a podcast if I had any vegetable favorites on the grill. I had to pause a bit to think of the vegetables I grill; there are many more possibilities than I originally thought.

Tonight, I really wanted to serve up salad for the gang and I wanted something substantial. Fridays are usually pizza night - tough act to follow. I had a butternut squash lying around, then I picked up some eggplant, potabellos, baby greens and some Egyptian style Feta from Mediterranean Imports (the Egyptian Feta is like a slightly salty chevre, it's amazing - and cheap). I chopped the veggies in medium cubes, tossed them in a generous splash of olive oil, added salt and pepper and a big bunch of finely sliced sage and tossed it on a grill.

I used briquettes** stacked on one side (a large bunch) and spread the veggies all around the grill using an indirect method but had all the vents opened. Very hot. The grill was capped and I went to walk Suze. About 40 minutes later, I took a spatula and tossed the cooking veggies to mix them a bit. Surprisingly, the squash, shrooms and eggplant cooked well together. I let them go another few minutes and tossed them in a bowl to rest.

Finally, salad prep: beautiful roasted*/grilled veggies on a bed of greens speckled with feta, grape tomatoes and a light splash of Parmesan vinaigrette. Not the best image, but I think it captures the dish. Roasted vegetables, more common in winter, redone for summer dining.

IMG_0880

We'll be doing many more veggies this season. Thanks for putting that seed in my head Jim.


*I did mean roasted because the kettle is covered. A covered Weber/kettle provides even heating, much like a vented oven. It's baking, with smoke.

**I must retract a statement I made on the aforementioned podcast. I said briquettes, by themselves, afforded no smoke flavor. They indeed do. It took a vegetable to notice it.

On a related note, I've been meaning to get a new product; Kingsford briquettes embedded with hickory - they'd be killer all purpose fuel.

6.02.2008

Sausage, greens and beans

A variation on our favorite, beans, greens and sausage

We usually have a special dinner on Sundays. We have a bit more time to think and plan the meal. This Sunday, however, like in past weekends, home improvement projects, landscaping, etc. left us a bit short on time for the dinner prep.

Saturday, I couldn't resist getting a couple chicken, spinach and Parmesan sausages (0.5 lb) from Weiland's. Didn't know what to do with them when I bought them. Sunday late afternoon crept around and, while cleaning out the hummingbird feeder, I sprung into action. I sauteed the sausage. When finished, I tossed in a strained can of chickpeas (Bush's), some baby arugula (12 oz, torn in shreds) and an additional touch of salt. I simmered it all for about 10 minutes, until most of the moisture from the leaves evaporated. Then, I let it cool a bit and served it up with ...

baguette with a new yeast from Hodson's Mill

The nifty thing about this meal is the sausage provided all the seasonings for the entire dish simplifying the preparation. And, next time, we'd double the greens and chickpeas for the same amount of sausage.