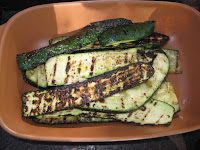
4.24.2010

Snack


I'm not a big gas grill guy, but my Weber Q comes in handy. I prepped and grilled some salted and lightly oiled eggplant slices. I also had a lump o dough in the fridge. Tossed it on and voilá, pita and eggplant sandwich.  Bit of Egyptian feta on it and I'd be in heaven.  Think I know what's for dinner soon.

4.19.2010

Grilled chicken patties, I think

zucchini side
Had an itch for some grilled meat tonight. Last night bought some chicken thighs and ground 'em up coarse. I was planning on making kefta, ground meat with spices, grilled up. I wanted to use chicken thighs for a while and this seemed a fun way to use them.

After looking through the net for kefta recipes, I gathered there may be no "recipe" for them. Some had grain (cracked wheat), some just spices, some milk, some bread crumbs... about the only consensus I found was ground meat (usually lamb or beef), spices and grilled on skewers.

A bit overwhelmed with the recipes and time running too short to check an actual book - I have a great mid eastern book I got from a friend, I tossed in the most antithetic Kashrut mixture there ever was. But, they were killer! Not one left for a pic. I served these with grilled, lightly seasoned zucchini strips, and a yogurt dip. Here's the recipe for the little nuggets from heaven.

Chicken "kefta"
Ground chicken thighs (skin and all), 300g
bulgur soaked in milk an hour, 60 g in 60 g milk
allspice, 1t
cardomon, ground, 1t
salt, 5 g
pepper
cumin, 1t
egg, 1
dried parsley, 1T
bread crumbs, ca. 1/2 C

I lightly kneeded the mixture and made silver dollar diameter sized patties and stored them in the freezer for about 10 minutes while the grill heated up. Grilled them about 1.5 minutes per side on direct heat. Let cool and served with yogurt dip (greek yogurt, lemon juice, parsely and garlic). I want more!

4.12.2010

TJ Goddess Dressing, deconstructed and reconstructed

Trader Joe's Goddess salad dressing is a favorite of ours.  I took it out the other night and was disappointed, almost gone.  The label, however, actually had ingredients I understood!  So, I plopped it on my kitchen balance and took a shot.

TJ Goddess Dressing Recipe
vegetable oil, 30 g
cider vinegar, 10 g
tahini, 10 g
soy sauce, 10 g
lemon juice, 10 g
Shake, yum.  A keeper.  I think it's even better than the original.
Enjoy.

4.10.2010

Dry curing humidity control: I don't know why I complicate things this much

Over the past few days I've purchased about 3 humidifiers (all used, about $11 total) and experienced a bit of frustration. I thought this was the best time of the year to cure sausage because my basement humidity increases during the midwest's rainy season and continues into the upcoming months (ca. 60°F and 60% RH). Now, I realize I was an idiot. After reading Ruhlman's post on sopressata (it's a fermented sausage, but the dry cure part should be the same for saucisson sec), he uses a simple dorm fridge with a salt bath for curing. The salt in the water (sat'd) only serves to bring down the humidity if it gets over 75% (a museum curator's trick).

With my previous set up, I was shooting for more airflow and humidity. Then I learned that evaporative wick-type humidifiers have a tough time breaking 55%. They work well when the humidity is winter-low, but not so well after that. They operate with a type of theoretical humidistat based on the method of water evaporation. I also tried a centrifugal humidifier where the water is sprayed and atomized in front of a fan. This was another cheapie and worked well, but pegged at 62%. After reading Ruhlman's post, I gave up on airflow and went with the near perfect plastic cylinder you see here (it is not a trash can). A dry run, no sausage suspended - just a humidity meter and I'm getting 70+% RH.


In hindsight, I learned a lot, only blew $11, and have an 8 gal humidifier that can probably humidify the entire house next winter (only $7.13, operates for about a dime a day and, it's very quiet). I guess I've had more expensive lessons.

I now have my curing environment worked out, my 2" dia. casings, and only need to order some mold (Andrew, need anything from Butcher-Packer.com?) and I'm ready.

4.07.2010

It's saucisson sec (curing) season

Please see end of post for updates

Inside the enclosure is my remote humidity sensor.
 It's saucisson sec season, but the humidity is still a tad low, around 55% in my basement.  I want to get started on curing since I have my larger casings and all (beef middles, about 62 mm), so I decided to put together this enclosure to maintain a higher humidity; a kind of microenvironment within my basement.  So far, it seems to be working.  I don't know how often I'll have to refill the humidifier, but it seems to be giving a high enough humidity.  After monitoring a few days, I'll be getting a batch together.


24 hours later, after all equilibrated:
Outside the enclosure - 58% RH, Inside - 65% RH, not as good as I'd hoped.

Replaced humidifier with stockpot of 2 gal water at approximately 100°F. I'll wait another 24 hours for equilibration and see how the readings go. I also put a Kill A Watt meter on it to see how much it would cost per day to run a hotplate, they pull a lot of juice.

4.01.2010

Popovers. Little help please?

Before the collapse
The other night, I was able to get home a bit early and make some beer-braised short ribs and noodles for dinner. Totally psyched, but I made a mistake and didn't make enough noodles and wanted to add a bit more starch to the meal. Popovers. Perfect. Could any bread be more straightforward?

milk, salt, egg, flour, mix, rest, drop into buttered, preheated muffin tin, poof, voilĂ . After baking 450°F for 5 min and 400°F for 20 min they looked wonderful. I took them out of the oven, a quick photo, turned my head, flop. Within a few seconds they were limp blobs of dough, not the huge, crisp popovers they were a minute before. This is the second time it has happened to me.

Update
Rachel commented that maybe I should've cooked 'em longer. The recipe I followed was from Ruhlman's Ratio. In Ratio, the cooking temp/time sequence is 450F/10 minutes, followed by 375F/20-30 min. In Ruhlman's blogpost, the baking instructions are "450 till done."
Mrs. Dave's Beer, an accomplished but oft-bullied-out-of-the-kitchen baker herself recommended the Better Homes and Gardens recipe. "It has never failed" she declared (she's right, she makes killer popovers). The recipe from BH&G is nearly identical with the exception that the muffin pan is lubed with shortening and there's a tablespoon of oil per 200 g of dough and the baking instructions are significantly different. BH&G prescribes 450F/20 minutes followed by 350F for 15 to 20 min or till very firm." The BH&G recipe continues to say (I'm sorry for violating all kinds of legal stuff, but this is important)
"If popovers brown too quickly, turn off oven and finish baking in the cooling oven till very firm. A few minutes before removing from oven, prick each popover with a fork to let steam escape."
With that much commentary after the baking temperature and time, I gather the recipe has produced a sunken popover or two prior to publication.

My take on this? The initial high temperature is needed for the oven spring and then the rest of the baking is for stengthening the exterior, yet not burning the outside. So, I'm with the more careful version of baking provided by BH&G. Don't know if the pricking with a fork is necessary, but I'll do it. Let you know how it goes.