7.22.2008

Vegged up Tabouleh

a variation of tabouleh
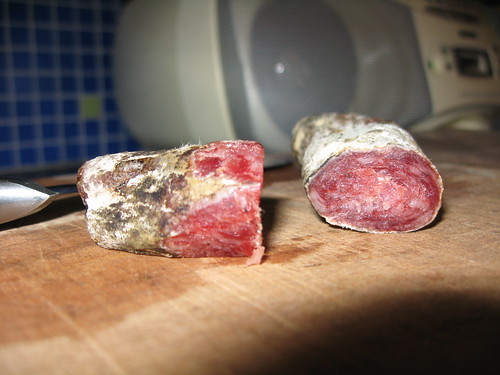
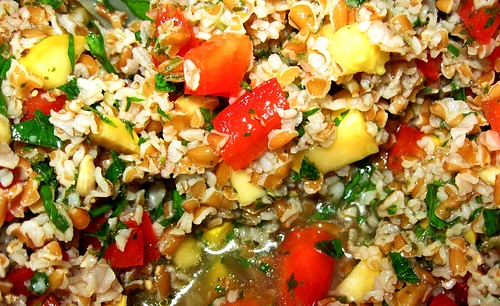
The colors are vibrant in this side.

We do weekly menu planning 'round here. Keeps the food bills in control and minimizes trips to the grocery store. Tonight's dinner was penned in as "chicken, veg, starch." I had my mind set on the chicken; brined breasts and bbq'd with a light coat of sauce. Nothing fancy. Kid loves it. The veg and starch were left open. I often leave these two parts of the meal open to give me a bit of flexibility during the week.

I had an idea to collapse the starch/grain and vegetable. Traditional tabouleh is a great side; the blogosphere and traditional sources abound with recipes despite its simplicity. The critical components of tabouleh are: hydrated cracked wheat, LOTS of parsley, mint, olive oil and lemon juice.

Breaking from a traditional tabouleh, yet keeping these critical components, I came up with this version based on what was in my fridge. It provided a nice all-in-one healthful, summer side for our chicken. It was served on a bed of spinach, a sliced tomato (also on the side) and, of course, the bbq'd chicken. A special summer meal.

There is a critical balance between the olive oil, lemon juice and salt. The quantities in this description are only a starting place. You'll have to keep tasting until it's to your liking.

Vegged up "Tabouleh", 4 healthy side portions
cracked wheat, 3/4C
water, 1.5C
finely diced red bell pepper, 1
finely diced yellow squash, 1 medium
parsley, flat leaf, finely chopped, ca. 1C
mint, 1T, dried (didn't have fresh)
olive oil, ca. 3T
lemon juice, 1.5 lemons' worth
salt, to taste (ca. 1t)

Mix everything at room temp, cover in wrap and let sit in fridge 12-24 hours in advance. Serve slightly chilled. Keeps nicely a couple days at least.

7.17.2008

Hot Air Popper Experimentation - I

air popper

Ever wonder what the temperature is inside those hot air poppers? Me too.

A month ago, I had a craving for popcorn and found a popper for a $1 at the Volunteers of America on Indianola. Having popped a bunch of corn, I wanted to probe further. I've used appliances like this to roast coffee beans successfully and knew they got pretty damn hot. But, how hot?

Armed with my trusty USB datalogger, I tossed a thermocouple in with the popcorn seeds and let it rip. I didn't anticipate the probe actually getting in the way of the popped corn, but no biggie. I was able to obtain the temperature of the beginning of popping before the popper nearly ignited. After the first few kernels popped at about 350°F, the chamber got jammed with popcorn and the edibility of the batch was shot (edibility?). It kept popping and jammed in the chamber. I don't know how the batch fit; kind of like an entire bag of cheese puffs fitting into a drunk frat boy's mouth. After chiseling the out the popped corn and letting the unit cool, I did another batch so I could have a snack while processing the data. It was good.

What will I do with this valuable nugget of data heretofore known only by senior scientists in the food science industry? Stay tuned (he said in a crafty voice).

7.13.2008

Saucisson sec is ready? (... non)

IMG_1158

If I were Bourdain, I would've bit in with gusto. I'm not. I trembled and felt I had to do it. It's now 3:45 and we're off to a 4-yr old birthday party. Wish me luck. It's been 5 minutes and I'm still alive.

Developing.

Update 14-Jul-2008
How was that suspense? No, didn't die, not even a twinge of stomach disruption. And, it tasted darn good.

My advisor in all things pork, Andrew, suspects it's a tad under-cured, because the innermost core of the sausage still looks a bit more moist than the outer ring of familiar dried sausage.

Some thoughts:
• I'll let the remainder hang in the humid environment and keep cutting them open for observation every couple months. This will be a learning batch.

• I think it was a reasonably good run; no rancidity observed at the temps/humidity.

• In the future, I will go one step further regarding safety and freeze per CDC recommendations to insure a higher level of safety. It's an easy step, no reason not to do it (although some French buthers would never freeze meat prior to processing).

• The way in which I pierced the casings was not good. I must use a PIN and not a knife point. Some of the sausage was funny shaped and it could have compromised the integrity of the casing during drying.

• I'm switching to fresh (not dry cured) sausage (sage and sweet Italian for starters) for additional experience with grinding and mixing techniques.

• The humidity fussing I did earlier was silly. From all I've read, more humid is better. Too much humidity only slows things down. I simply hung them on a hanger inside of a tall, clean trash bucket in which the bottom had a few inches of water. This environment, with the sausage curing gives a steady 80%+ relative humidity and my basement was about 65°F during the entire cure.

• Finally, I think I need much wider casings for the sausage since it shrinks a lot on curing.

• Definitely a project I will revisit!

7.09.2008

DIY Food Dehydrator v. 2: Cherries

The 2nd Version of my dehydrator is a keeper. Been cranking out some hefty sheets of fruit. Haven't stacked trays yet; still working out some details.

A couple years ago, our dear neighbors from our old neighborhood gave us a zillion sour cherries from their tree. The Mrs. pitted and tossed them in the freezer and that's where they've been - for at least a couple years.

The Mrs. was kind enough to let me have the fruit of her labor for a dehydrator challenge. I sugared them a bit (ca. 1/2 C per huge batch shown) and lay them out for a dehydration session. They were really wet and soupy. Took about a week. But they didn't stick together, didn't get moldy. They turned out slightly tacky, well-separated and tasted like no dried cherry I've ever experienced. And, better than fresh. Check 'em out.

cherries, before
Before: The big puddle of goopy cherries.

cherries, after
After: Please, I beg you, click the image, it's awesome.

7.06.2008

Grilling Veggies: flip flop

"roasted" on my kettle veggies
Beets, Zucchini, Garlic and Vidalias

Recently, I've had the good fortune to become better acquainted with Jim, Zach (Jim's associate who produces podcasts on Columbus Food.tv and, of course, Zach's lovely wife and fellow foodie, Mary. We've talked some fun food topics.

Most recently, we had a session discussion grilling veggies. I stated in the discussion I was content to grill veggies directly over coals, on the grate with no special utensils or pans.

The more definitive a statement I make, the more I am likely to think about it, question it, and change my mind. I think they call that flip flopping in the politics arena. Can't feel bad. Etched-in-stone habits are always healthy to challenge.

Back to the flip flop. We just got our share of veggies yesterday and I was cleaning greens and prepping veggies for the week ahead. The beets looked enticing; I thought roasting the beets and putting them on a bed of greens with a little feta and bread sounded perfect. I actually had never tried grilling veggies in a pan on the grill. Hmmm. I skinned the beats, chopped the zucchini, quartered an onion, tossed in some sliced basil and a couple slivers of garlic (all with a quick splash of olive oil and salt and pepper) and tossed the pan on the grate over the hot coals. Then, I went to walk the dog.

About 15-25 minutes later, bam! (ouch). They were gently smokey (I used Kingsford/hickory) and nicely browned. They cooled a bit and were tossed on the bed of greens. It was a lovely meal.

The shallow roasting pan was easier than tossing the veggies with a spatula and there was no chance of losing any in the grate, so the size of the dice didn't matter. I must also say, I use a pretty darkened thin roasting pan and don't bother to keep it shiny, it's clean but never looks it. I may never roast roots any other way again.

7.02.2008

Tahini Mixer (cordless)

I know this looks odd, but I do have a reason for it.
Today's child has no idea how damn lucky they are. They have hummus (however the hell it's spelled). Back in my day, I'd get a jar of peanut butter and be happy about it.

Hoummus (I'll spell if a few different ways so I'll occasionally get it right) is one of the most popular staples in our repertoire. Simple, healthy and fast to prepare. And, the kid likes it. One problem. The critical ingredient, tahini, like most nut butters, separates on standing. This makes it tricky to pour or portion it into a recipe. Are you getting oil or the nut paste when poured? If it were mixed uniformly, this wouldn't be an issue.

I always wanted to bring my tahini to the paint store so they could shake it on the paint stirring shaky thing. I just wasn't bold enough to actually do this so I tried to figure out a way to do it at home. The first thing I thought of was an immersion mixer. Problem with this is there's too much surface area and I figured the sticky tahini would adhere all over it ending up in a mess. The impeller in this application needed to have minimal surface area so the really sticky hummus wouldn't stick all over it.

I have these sharp, metal kebab skewers sitting in our infamous household "junk drawer." I don't use them for anything. I once brandished a bunch of the spikes when greeting a Jehovah’s Witness at the door trying to give me some Watch Tower shit, but that's about it. Suddenly, it hit. The loop at the end looked like a perfect impeller for this task. I grabbed my charged drill and gave it a whirl. In seconds, I had an extremely uniform tahini. When I pulled out the stirrer arm, it was nearly free of tahini.

I'm filing the process patent application tomorrow.