When I visit the Starbucks on N Broadway and N High I sit at the bar and study the line that builds between 7 and 8. This line is profoundly different than any line at a McDonald's where customers stare at their phones while ordering rarely acknowledging the unfortunate soul behind the counter. Customers at Starbucks holster their devices 3 places out waiting for their turn to engage with their barrista with anticipation rivaled only by a meeting with the kid at the Genius bar.
My favorite employee, Jen, works mornings, the spirited and giggly Cia works nights, Shawn is friendly and polite, his father loves gadgets, the unshaven guy sometimes at the register got his skateboard backpack at a thrift store and a newly-mustachioed Jason plays at Wild Goose once in a while with his band. One young lady is delightfully pleasant and talkative when business is quiet. Annie is a little standoffish toward me, but I know she's a psych major who decided grad school just didn't do it for her, she enjoys her work. Kelly is diligent, damned efficient and knows how to run a shift. They all know things about me.
At a popular Short North cafe, I recently had a pourover that was lukewarm because the young lady, managing at least another customer or two, didn't care. I've been about four times: two visits were bad and two were mediocre. It's not where I'll go to consume my ration of caffeine or spend my limited funds. Oh, their coffee's outstanding and local and all that.
Something about the too oft-maligned Starbucks' employees is magic. They are the soul of the successful franchise because their coffee is insipid; I wish I had the nerve to bring my own and offer them a sitting fee. Yet, I go, I sip, I enjoy, religiously. I yearn for a social connection with my consumption - especially when I'm slapping down cash for food. Don't hate successful businesses, study them.
Dave is a frustrated amateur food scientist and former chemist who blogs about food at
weber_cam and occasionally blathers at Dave's Beer. Today he provides
unsolicited advice to local business owners.
12.30.2011
Local business, a consumer's perspective. (Columbus, OH edn)
12.28.2011

12.14.2011
Bread for the teachers (again)
The other morning, I made bread for the teachers at Frankie's school. It's a fun morning of baking which I've done once before where I make about 40 pieces of bread for our hardworking public teachers as a small tribute to their dedication. This run was a little different than in the past and I learned a lot.
Testing yeast and flour on smaller scale is helpful, but nothing is like the real run. I used to cook on perforated thin sheets of stainless steel for convenience and other reasons but have turned back to clay tiles. The most significant factor in baking crusty loaves at home, I believe, is humidity in the oven. Anyone can humidify an oven with any "trick" they think works but I also believe most crust faults result from too much humidity. Anything else I say is without substance because measuring relative humidity in an oven at 400-450F requires a really expensive probe. Until I do some measurements, feel free to read Julia Child's famous recipe on how to make crusty baguettes. Her too many ways to humidify the oven convinced me none of them are very effective.
In this run, I tested no steam and relied on a pretty full oven full of bread to provide the initial moist environment. I cooked about 2 lbs of dough at a time in 75 g rolls using 450F and convection on preheated tile. The convection was a further attempt to dehumidify the oven in late stages of baking.
Dough prep: I went with a basic lean bread dough: water 360 g, Fleischmann's fast yeast 1 pkt (7 g), olive oil 10 g, salt 10 g, unbleached white flour (Montana Sapphire) 600 g, and kneaded in a bread machine. I did this 4 times and set the blobs in a 15 qt stainless pot on my ca. 40F deck for the day. 7 hours before baking, I pulled in the pot to let warm up, when I woke up, it was 60F. The dough was portioned in 75 g balls (about 65 g after baking), rounded, let rest and shaped them into minis. I cooked 12 at a time for about 20 mins each. The total baking session was about 2.5 hours. The crusts were slightly crackled on the surface and the crust may have been the best I ever achieved. This is a sloppy post, I just needed to document it. Here's some action shots:
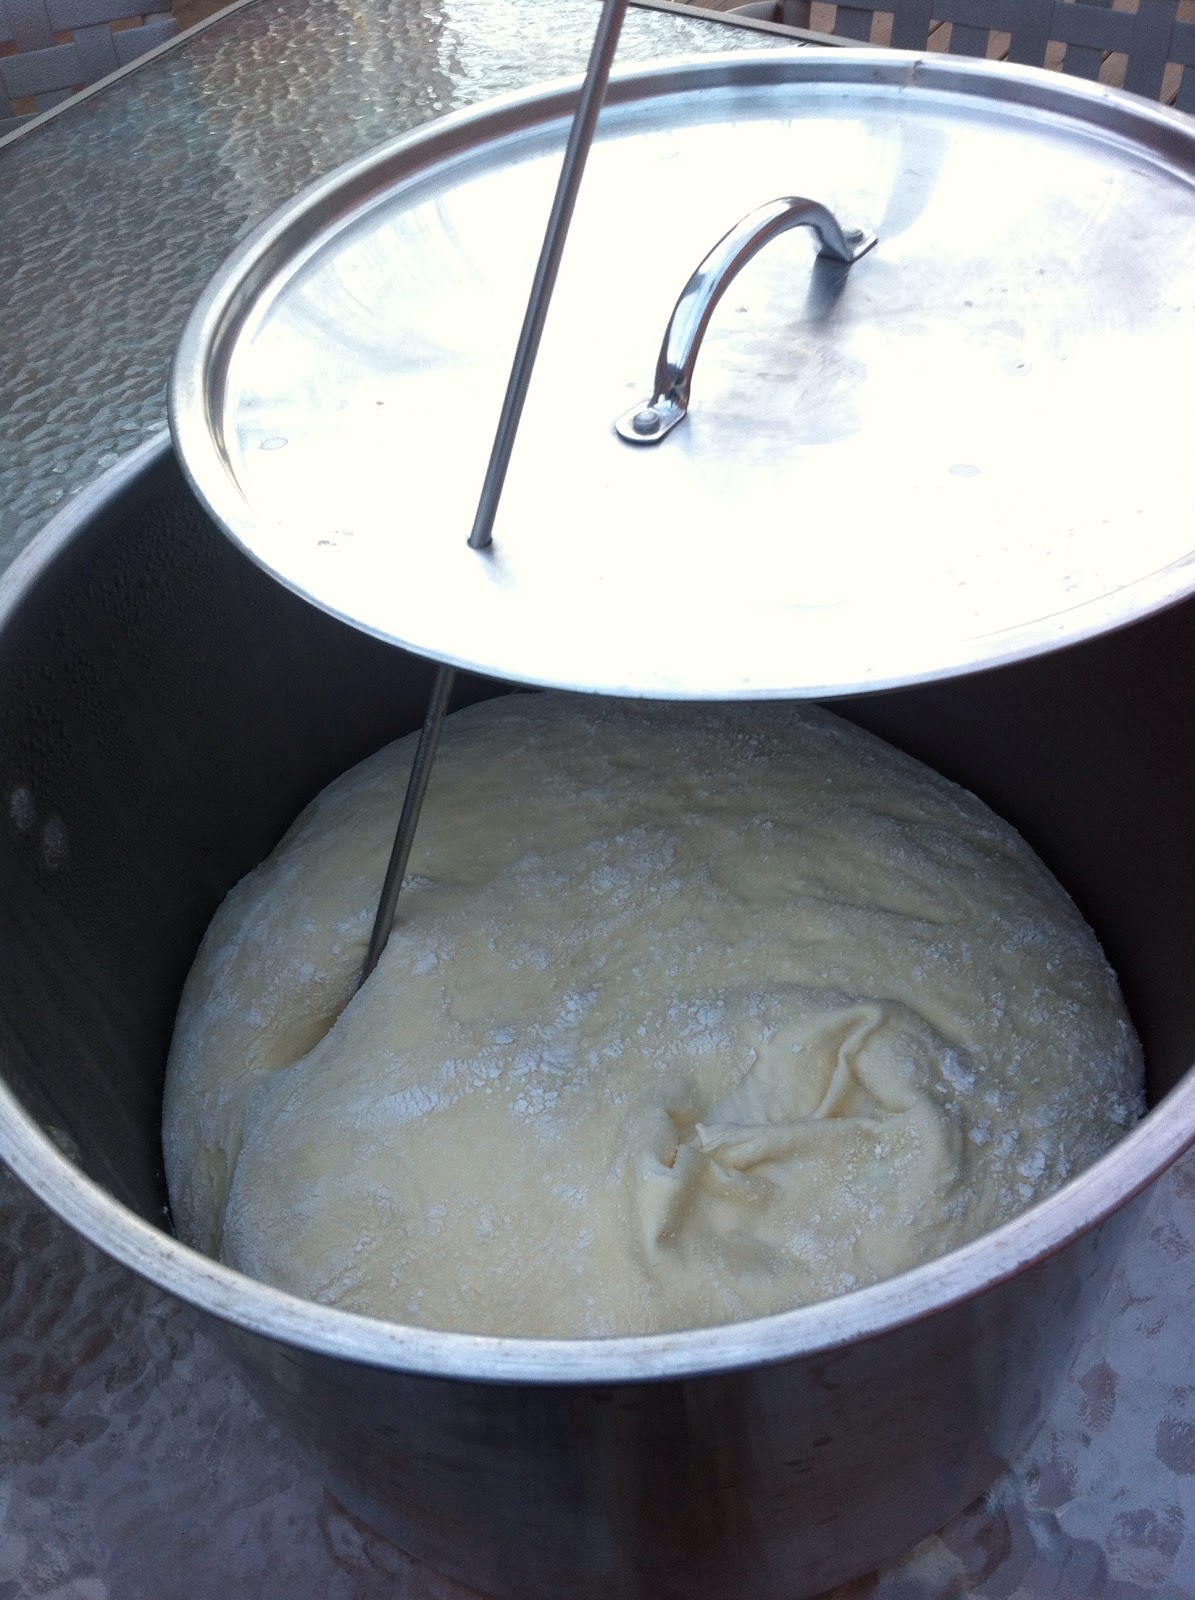
I made the dough about 24 hours before and left it outside at about 40F the entire day.

I took the pot in 7 hours before baking to warm up in a 60F house.


12.05.2011
Merguez: three painful hours

The last time I endured 3 hours of French-related agony was in grad school when, in an attempt to convince my girlfriend I was all that, I sat through Germinal. It was the longest, darkest movie I never understood.
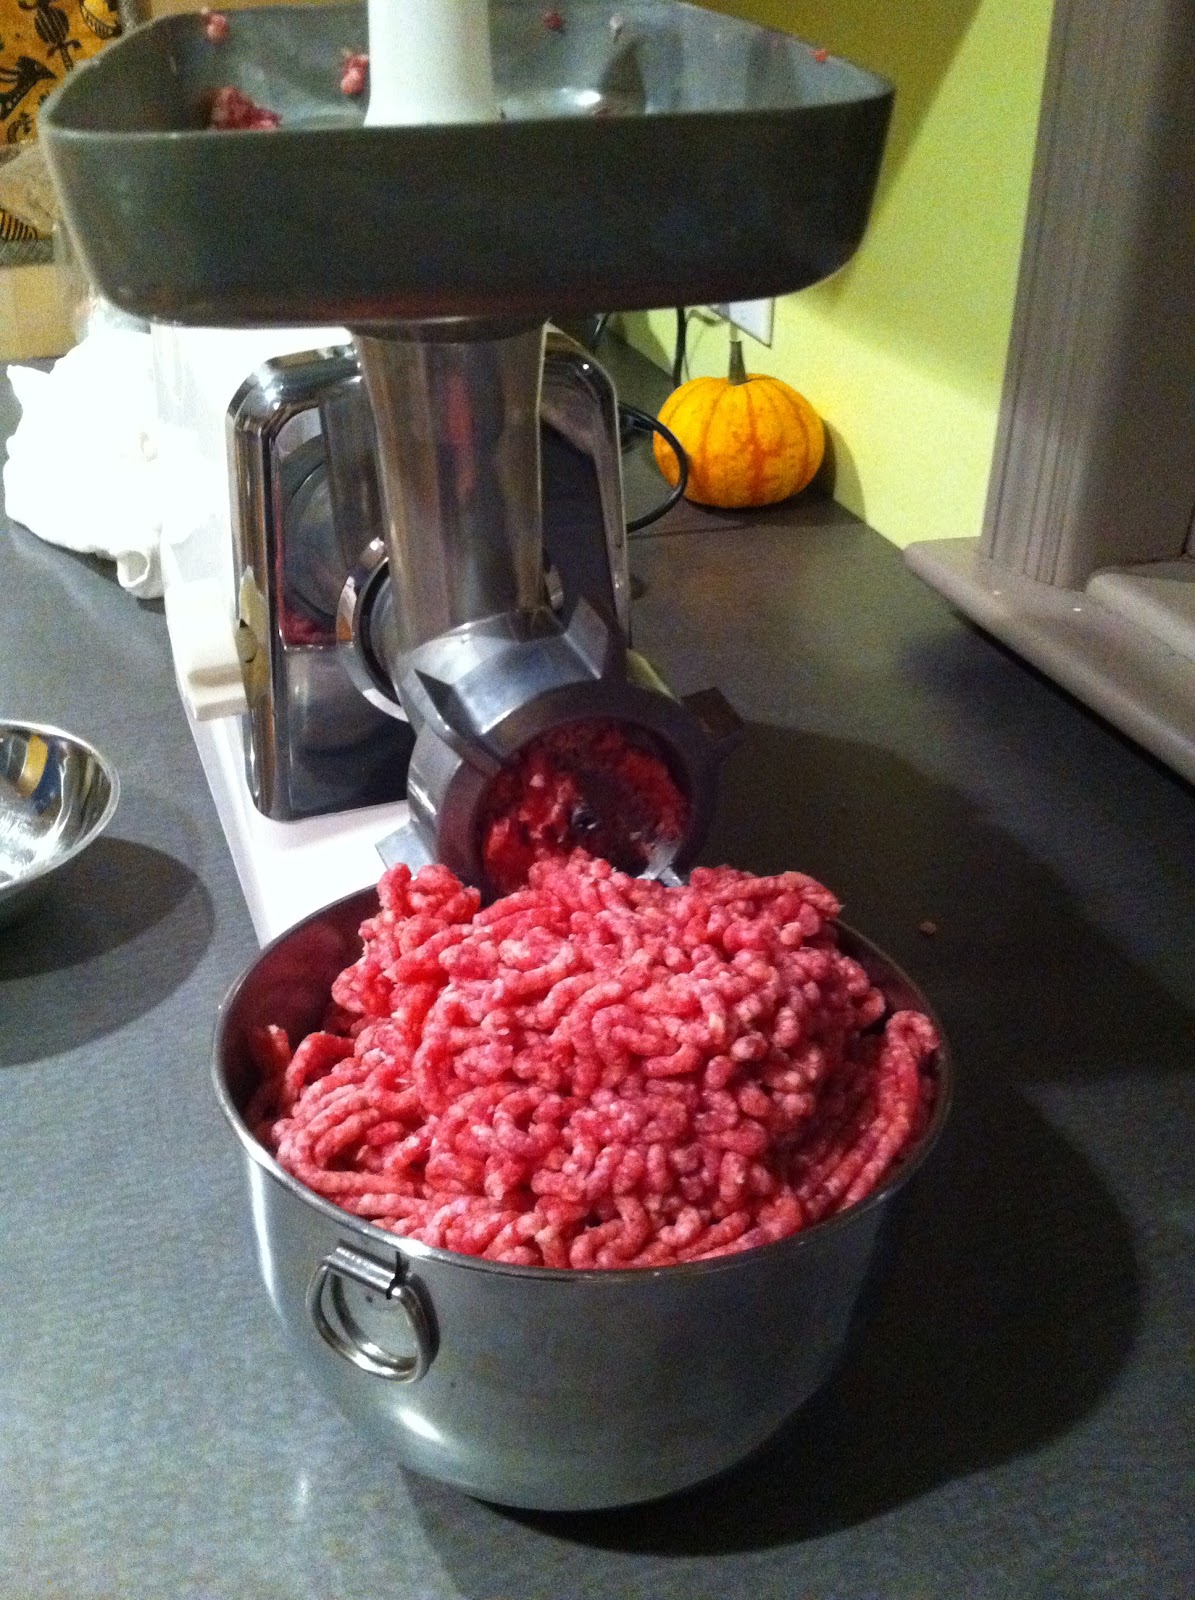
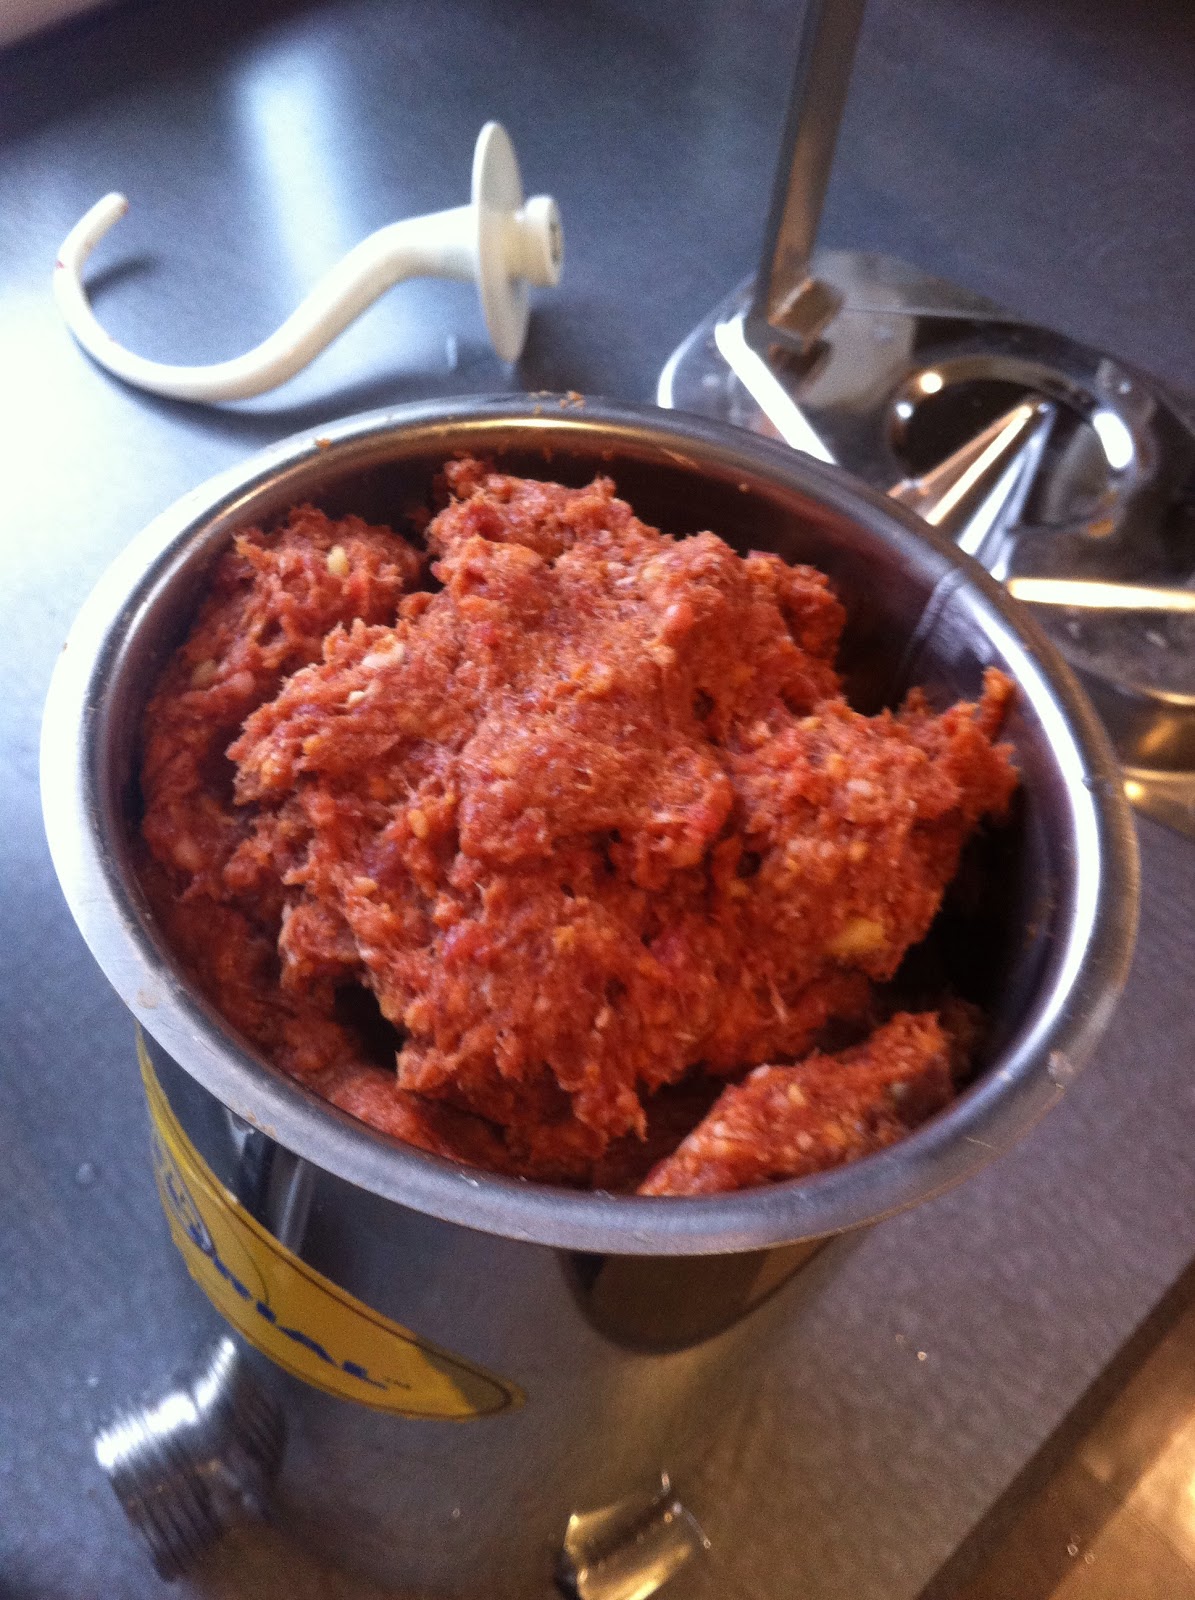
Lucky enough to still have that woman in my life, I tried to make something she and I would enjoy to relive a past adventure to Paris. I tried my hand at merguez. A spicy, really red, greasy link sausage most perfectly served with couscous. Despite SaucissonMAC's expertise and directed readings, I was overwhelmed trying to find a recipe. Having had it in Paris once long ago, I believed I could recall enough to alter a recipe that would reproduce what we ate so long ago. I'm recording this less than successful episode because I'd like to try again.
Here's some details:
- Lamb, 2000 g, from a 9 lb halal shoulder from Mediterranean Food Imports, cut by the butcher into pieces, ground twice using a small die (yield about 3 kg, kept some for later)
- Pork fat, 250 g, (so much for the halal thing)
- Salt, 30 g (only 6 g/lb, but I was relying on getting some additional salt from the harissa)
- Garlic, 25 g finely minced
- Paprika, Spanish sweet, 2T
- Paprika, spicy, 2T
- Cumin, 2T ground
- Coriander, 2T ground
- Cinnamon, 1t
- harissa, 60 g, a commercial preparation from the same market (this is where SaucissonMAC may yell at me), this was the brand I used.
- water, 60 g
See a few pics below of the process. Should've been more images, but my hands were busy trying to muffle the f-bomb attack.
After mixing until slightly sticky, I fried a sample patty. With $45 dollars of lamb on the line, I feared too much salt or too much hot (harissa) and I fell content too quickly. The salt was perfect but (in hindsight) it lacked heat and it wasn't red enough. I really, really wanted the blazing red color. I now realize the signature of this sausage is harissa and I should've made my own, but the stuff I bought tasted good and was smokin' hot; I think I was simply too light on it.
To this point, the prep was a delightful walk through the kitchen. Then came stuffing into the sheep casings and I was immediately transported to the mines with Depardieu choking with black lung. The casings were tough to thread on the stuffing funnel, they tore, etc. I forged ahead for a few hours. I manged about 3 lbs of links and saved the rest as bulk.

While not a total flop, it's a darn good lamb sausage, but definitely room for improvement.
11.16.2011
let rise until doubled in volume
Recently, I decided to measure the volume of the first rise of bread dough containing various combinations of yeast, flour, shortening, etc. in order to see if this volume had any predictable relationship to favorable attributes in the final baked bread. I conducted the test on a small portion and called it an assay. The motivation was to try to gain some reproducibility in the final bread that has plagued my deceptively simple baguette. The volume measured was not predictive of the success of the final baked goods, but the method of measuring the volume of a small dough ball might still be useful.
The expression that titles this post is ubiquitous in bread baking texts. It's a way of telling a baker when to toss the risen dough into the oven, in other words, how long he should proof the final pre-cooked loaf. I don't know why the factor of 2 is significant, I'm guessing it was a more terse way to describe a complicated reaction; proof too long, the bread falls and is dense - under proof and the final loaf is equally ruined. This doubling factor is simply the optimal rise time to get the best oven spring without it flopping upon exposure to high heat.
"Doubled in volume" is not an intuitive end point observation on something shaped like a blob. Using what I learned on the volume measurements, one could take a small fraction of the dough, a small sacrificial piece, and measure its volume in a cylinder over time and use it as a type of indicator for the rest of the dough. In the video, we observe the full range of the lump of dough over time in a narrow cylinder. It actually rises about 3 times its original volume. But, at the end of the rise, we see the curved surface of the dough leveling out, indicating the dough is coming to it's maximum volume. This end of the rise also indicates the point in which the entire mass will collapse with a minor tap. This was a lean dough composed of water 180g, unbleached white flour 300g, yeast Fleischmann's rapid rise 7g, salt 6g, canola oil 6g and from that 100 grams taken for the measurement.
I think it's an interesting diagnostic to run beside a rising loaf. This dough ball is a sample of the bigger loaf; if it rises in the same conditions, it should provide an indicator how long to proof regardless of whether your kitchen is hot or cold, etc. In this case, the loaf should be baked an hour into the rise.
ps Dear @Conagra, can I have a job?
11.07.2011
A cast iron oven example boule.

10.31.2011
couple petit baguettes from a starter
I hacked together a starter, a wild yeast culture worked up from Stutzman farms whole wheat and then shifted to mostly white starter over the past couple days. I tried it out by incorporating some into a simple dough last night, prepped the rolls this morning and I'm about to dig in ... pretty tasty. Definitely worth pursuing.

10.29.2011
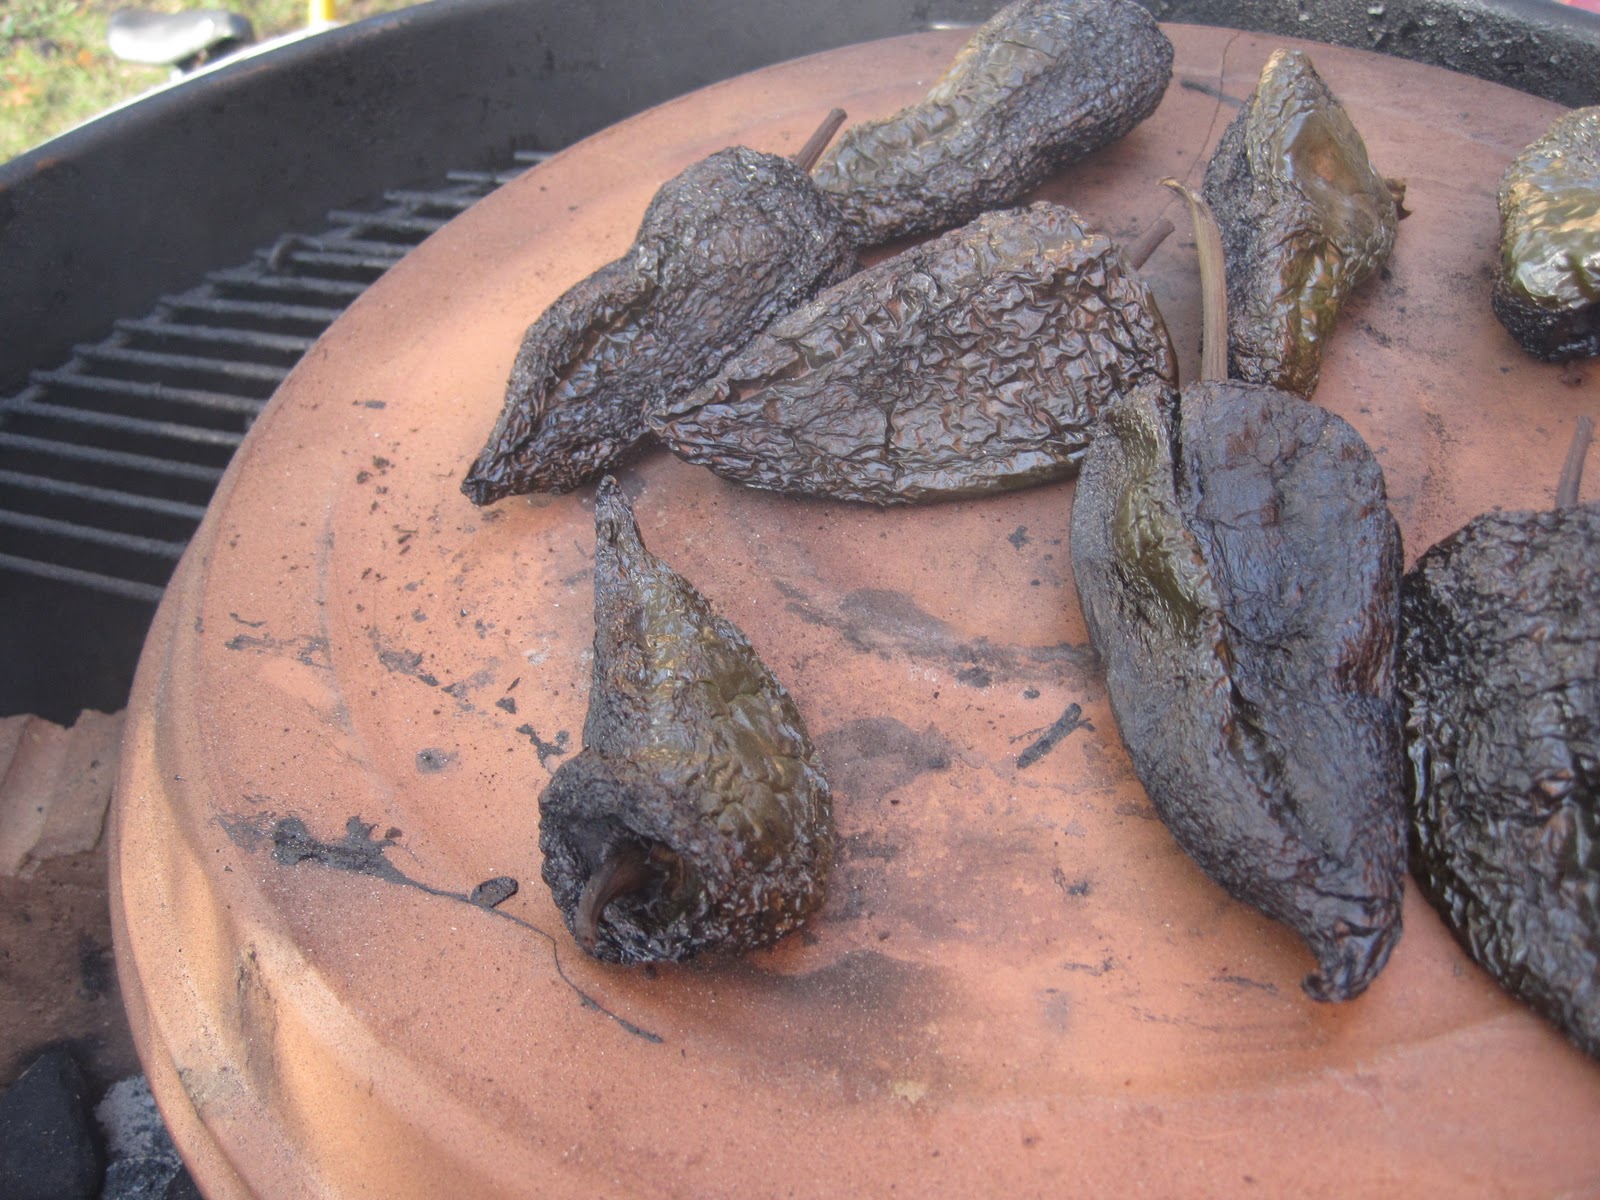
behold, the weber_cam (smoking poblanos real time)
Before...

After...
10.26.2011
Volume and little crispy boules that will eventually hold a meatball
Found a patent today I wanted to try to reproduce. The claim was a dough containing ascorbic acid, L-cysteine and xanthan gum produced a bigger volume bread than any single component. I've been trying little crispy boules because they're cute, they can be hollowed out to make a meatball slider and I can make a bunch of them quick if I want to feed the teachers.
Here's the comparison I did:
6 little crusty rolls on each side. These were made from 2 recipes varying only a few additives. Each roll started as a 40 gram ball.
Dough was made from
water 90 g, unbleached white flour 150 g, sugar 5 g, soybean oil 1% rel to flour, Red Star active dry yeast 3.5 g, salt 2.5 g.
-added to Left 6 rolls' dough:
vitamin C ca. 60 ppm
-added to Right 6 rolls' dough:
vitamin C ca. 60 ppm, L-cysteine 10 ppm, xanthan gum (all nat Bob's Red Mill) 400 ppm.
 |
| click image to enlarge, the difference is a little more clear |
The difference is tough to quantify (note: post baking weight average both sides 35 g). Finished bread volume is not trivial to measure, but the ones on the right look a little more full and they opened better at the slashed places. I'll let them cool until tomorrow and take a taste. While bread is warm, flaws are harder to catch, once cooled I can make some observations about taste, something to look forward to tomorrow.
Regarding parchment, on all but 1, I used a small disc in the bottom of the tin. It was plenty to prevent a blob from sticking. On the bread in the lower left corner, I used a cupcake liner and it stuck to the roll like glue. Those cupcake thingies are awful.
10.24.2011
dried apple chips
I've never been quite sure what is in those packages labeled "dried apples." This is what they look like when I make them - I do wish the images were better, but still tasty...


10.09.2011
I've been making some many tons of dough lately, working on my silly VFR100 assay, I've got nothing blogworthy, but this is good
I've posted this before, but it's so wonderful and it's so good that Scoopy didn't eat it before it went in the oven, just a lame old pork shoulder from Walmart popped in the oven last night at 225 for 8 hours. I had a little sugar, salt and pepper rub on it. Let it cool a while and pulled. It will supply at least a couple meals this week:
1. pork atop a bed of greens with asparagus on the side and bread
2. stuffed in tortillas
hooray pork!

10.02.2011
Some menu items for the week...
First of an occasional series. I thought I'd share a few of our weekday menu items. If lucky, I do some of the prep Sunday mornings:
![]() 1 comments
Labels:
dinner,
menu,
veggies
1 comments
Labels:
dinner,
menu,
veggies
10.01.2011
VFR100 reworked assay
Another in a series of incredibly tedious posts guaranteed to scare away even the most dedicated of readers. To refresh your memory, this is to get an aggregate metric to characterize a combination of yeast, flour and any additive by the volume of the first rise. Once analyzed it will be applied to see if this volume (VFR100) is predictive of final baked bread attributes. See background of measurement in previous post. I reworked my assay a bit.
1. add:
-salt as a 10% w/w solution
-vitamin C as a 0.1 g / mL solution
-qs to volume, 90 mL
-yeast 1/2 t (assuming bulk solid density for yeast is constant)
-soy oil delivered by pipette
-flour 150 g
2. knead 10 minutes via machine
3. scale a 100 gram piece and round it
4. let rise in cylinders like these, tall narrow to elongate final reading for precision, coated on inside with floured oil spray so the maximum height is marked after maximum rise falls, e.g., see typical final rise volume in image below.
 |
| click image for close up, left two are fast rise yeast and right has an extra 100 ppt shot of vitamin C |
C = vitamin C
yeast (charged at 2%):
salt for these 250 total dough runs, 2.5 g
| fat (% v/w) | yeast | additive | V of 100 g rise (mL) |
|---|---|---|---|
0.0 soy
|
RedStar
|
0
|
262 261 260 258 260
|
2.0 soy
|
RedStar
|
0
|
308 313 263 280 301
|
2.0 soy
|
RedStar-f
|
0
|
255 275 278 280 301
|
2.0 soy
|
RedStar
|
C 1000 ppm
|
338 320 320 310 333
|
2.0 soy
|
Fleischmanns-f
|
0
|
275 280 274 275 295
|
2.0 soy
|
RedStar
|
C 2000 ppm
|
321 326 338 345 360
|
Preceding runs anova=> R results
Significant effects: -oil in the dough gives greater volume than no oil, consistent with literature for baked bread volume - may be worth evaluating more concentrations -Big vitamin C effect but not so much between 1000 and 2000 ppm -fast rise yeast bigger volume than active dry *Additional values added after anova tabulated below |
|||
2.0 soy
|
RedStar
|
C 1000 ppm, lecithin 1t
|
380
|
2.0 soy
|
Fleischmanns-f
|
lecithin, 1t
|
280
|
2.0 soy
|
Fleischmanns pizza
|
L-cysteine in yeast
|
296
|
4.0 soy
|
Ff
|
0
|
???
|
The sloppy discussion (by sloppy I mean I'll keep adding to it as I think about it)
1. The volume effects, despite the unbalanced design, reflect a lot of what's observed in the literature. A low concentration of oil in lean dough is well-documented to result in bigger volume loaves and this is what's observed in the dough as well.
2. One of the biggest effects is the vitamin C (ascorbic acid)* added to dough. Vit C addns. gave structurally sound, huge dough volume on rising. As far as concentration, I killed it, 1000 ppm is a lot more than the more conventional 50 ppm seen in the literature. However, I haven't yet found articles relating to the specific increases in volume of final baked breads as a function of vitamin C concentration. In my hands, breads made with 1000 ppm (100 mg vitamin C per 100 g flour) have consistently crappy oven spring, it's a real bummer of a result.
3. Point 2 is leading me to believe the VFR100 just isn't predictive of the things I'm looking for in a final loaf.
4. This assay, to do with enough replicate runs is laborious, all the practice I did was interesting and useful. I'm considering a way to make it a faster analysis. That way I could crank many more effects and be able to see parameter interactions. Maybe some pilot work and then take a look at reducing vitamin C/fat to try to figure out the interactions.
* Note: There are some who believe vitamin C and ascorbic acid are not the same. They are, atom for atom, stereocenter for stereocenter, etc. etc. identical in every single way.
9.05.2011
breadcrumbs
Obviously, there's no shortage of raw materials for breadcrumbs here. My need for breadcrumbs is primarily in the breading of smelts. I like the crumbs fine and uniform to give tenacious coating to the deep fried delicacies of the sea. Believe it or not, I usually buy my breadcrumbs because every method to make them sucks. I won't use the Cuisinart since it was designed to be irritating, 4 pieces that are difficult to clean isn't worth my time. Pounding the stale bread with a mallet is messy and often breaks the bag. Before going to the market to get some (Progresso), I tried this...

honest. I placed the crisp bread in a heavy plastic bag and made some use of the several ton piece of modern life in the driveway. I pushed the car back and forth over it about 5 times. Aside from a little fear that the neighbors would think I was insane, it was pretty easy. But, uneven particles. If they're not fine enough or uniform in size, the breading can fall apart in the fryer. Darn, another genius idea failed. I'm off to market.
9.03.2011
On the Development of a Predictive Metric for Bread Loaf Volume, the VFR100
It is generally recognized among food scientists that greater volume in a baked bread is associated with favorable properties like tenderness, desirable mouthfeel and reduced rate of staling.*
Personally I like bigger volumes in my breads and the pursuit of achieving that continues today for my white and wheat breads. Bigger volumes are most commonly obtained with a small fraction of fat, ca. 3% w/w percentage of the grain bill.* In addition to the oil, a functional ingredient, I have also noticed the brand and type of yeast have a significant impact on the dough (structure during rise, tackiness, rate of rise, etc.). Further complicating this is my unsubstantiated loyalty to a particular flour.
Evaluating the effect of various combinations of fat, yeast and flour on the final baked loaf is a daunting task. After the ingredients are mixed, many factors, e.g., the number of rises, the proof (final rise), docking, baking method, baking sheet, oven humidification method, etc. can have a significant effect on the results. In an attempt to support these preferences with something more quantitative, I'd like to find a reproducible and relatively fast assay for these ingredients that correlates with a final baked product.
My hypothesis: Given a selection of dough ingredients, the volume of the first rise will lead to a predictable outcome of the final baked loaf of bread, presumably the greater the volume of the first rise, the better the loaf. I'd like to stop at the first rise because I think it's the optimal point of intervention. All the ingredients are included and working. One serious potential flaw is there is no way to evaluate the effect of oven spring. This volume will be called Volume of First Rise of a 100 grams sample, the VFR100.
Method for obtaining the VFR100
The data collection phase will take a long time. I'll populate the table as results become available. Feel free to suggest additional parameters in the comments. I can't promise I'll include them in the testing, but I'd love the input.
data collection underway
Table Abbreviations
ap, all purpose
b, bulk
C, ascorbic acid
f, fast
F, Fleischmann's
GM, gold medal
MT, Montana Sapphire
RS, Red Star
ubw, unbleached white
* http://onlinelibrary.wiley.
9.02.2011
A DIY Uncrustable, Kid Lunch Edn.
Well, kids are back in school and I'm working to figure out new things for Frankie's lunch. Remember seeing those peanut butter and jelly pockets on tv called uncrustables? While discussing this odd food during dinner, I was wincing and Frankie was wriggling with delight over the thought of them. After I tried a version of my own...

using a ravioli press, some wheat bread and some intense muscle power with a rolling pin, I failed miserably. I made squashed bread with oozing fillings. It looked even worse than this picture by the time I finished.
Then, Frankie helped. I needed to "clamp down the side of the sandwich." Hmm. Here's how it went once she jumped in to help.


Each side of the sandwich was then reclamped thusly. Notice the complete absence of oozing.

8.17.2011
Richard Stephen, CEO of Weber, can I get a grant for working on this simulator?
(... or a new Easy Bake oven for pizza)
I have at least one lingering issue regarding my Firedome project: Does the intake of air from the bottom hemisphere matter? What happens to inside if I take air in...
a. through the bottom center?
b. through the sides?
c. both?
d. is there a swirly kind of convection of air going on?
e. can I get higher temps by optimizing this pattern of vents?
etc.
Instead of carving up a zillion bottom halves of grills, I figured it was time for a simulation vessel. I'll use tea lights initially for a heat source and measure temp differences with a thermocouple in the lid and try to use a smoke source (incense?) to visualize air flow patterns. Of course, if I didn't dislike reading so much and I could figure out the math, I might be able to make a more sophisticated hypothesis, but this is more fun. Also, there is a flat disc in the middle (cooking surface) that might screw up calculations, so here goes...
 |
| Bottom half drilled out bottom and side vents. It is also affixed with a lower grate that will hold the fuel source. |
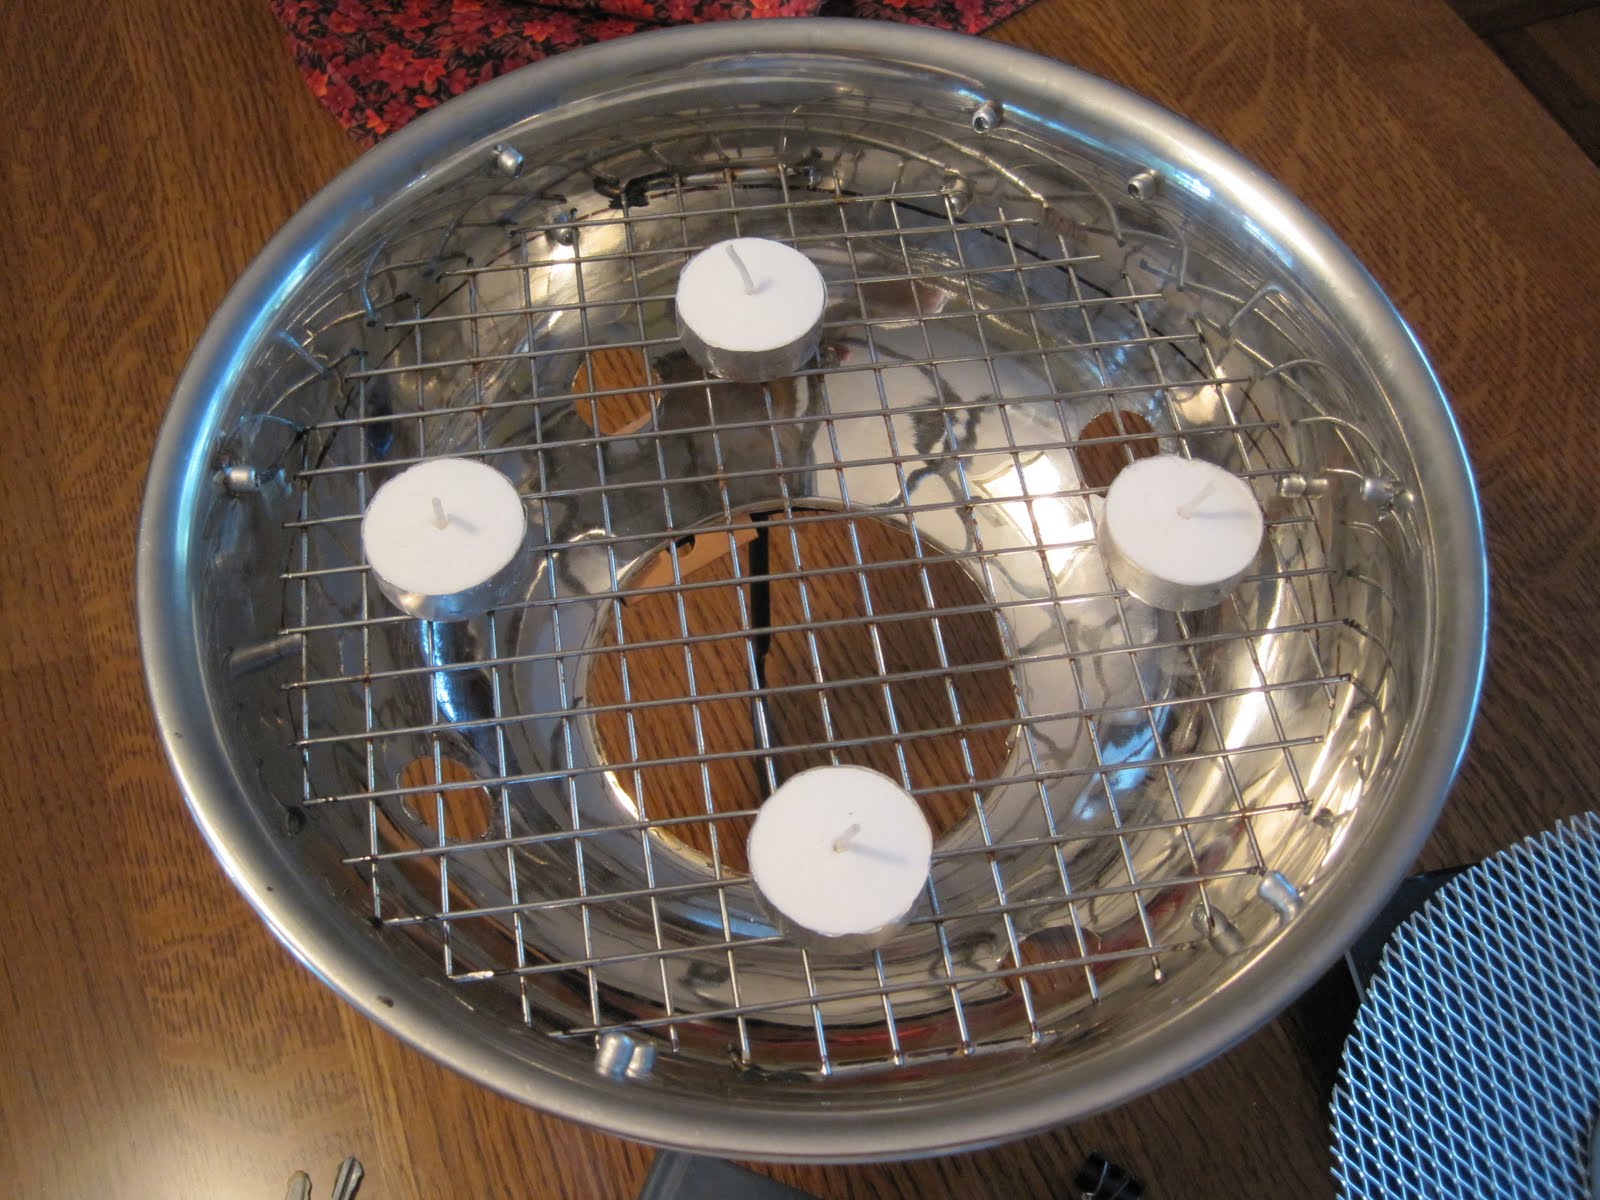 |
| Lower grate in the bottom half with tea lights, a proposed initial fuel source. |
 |
| The bottom half now equipped with the upper grate, or in the real grill this is the cooking surface. I need a teeny tiny clay surface for this. |
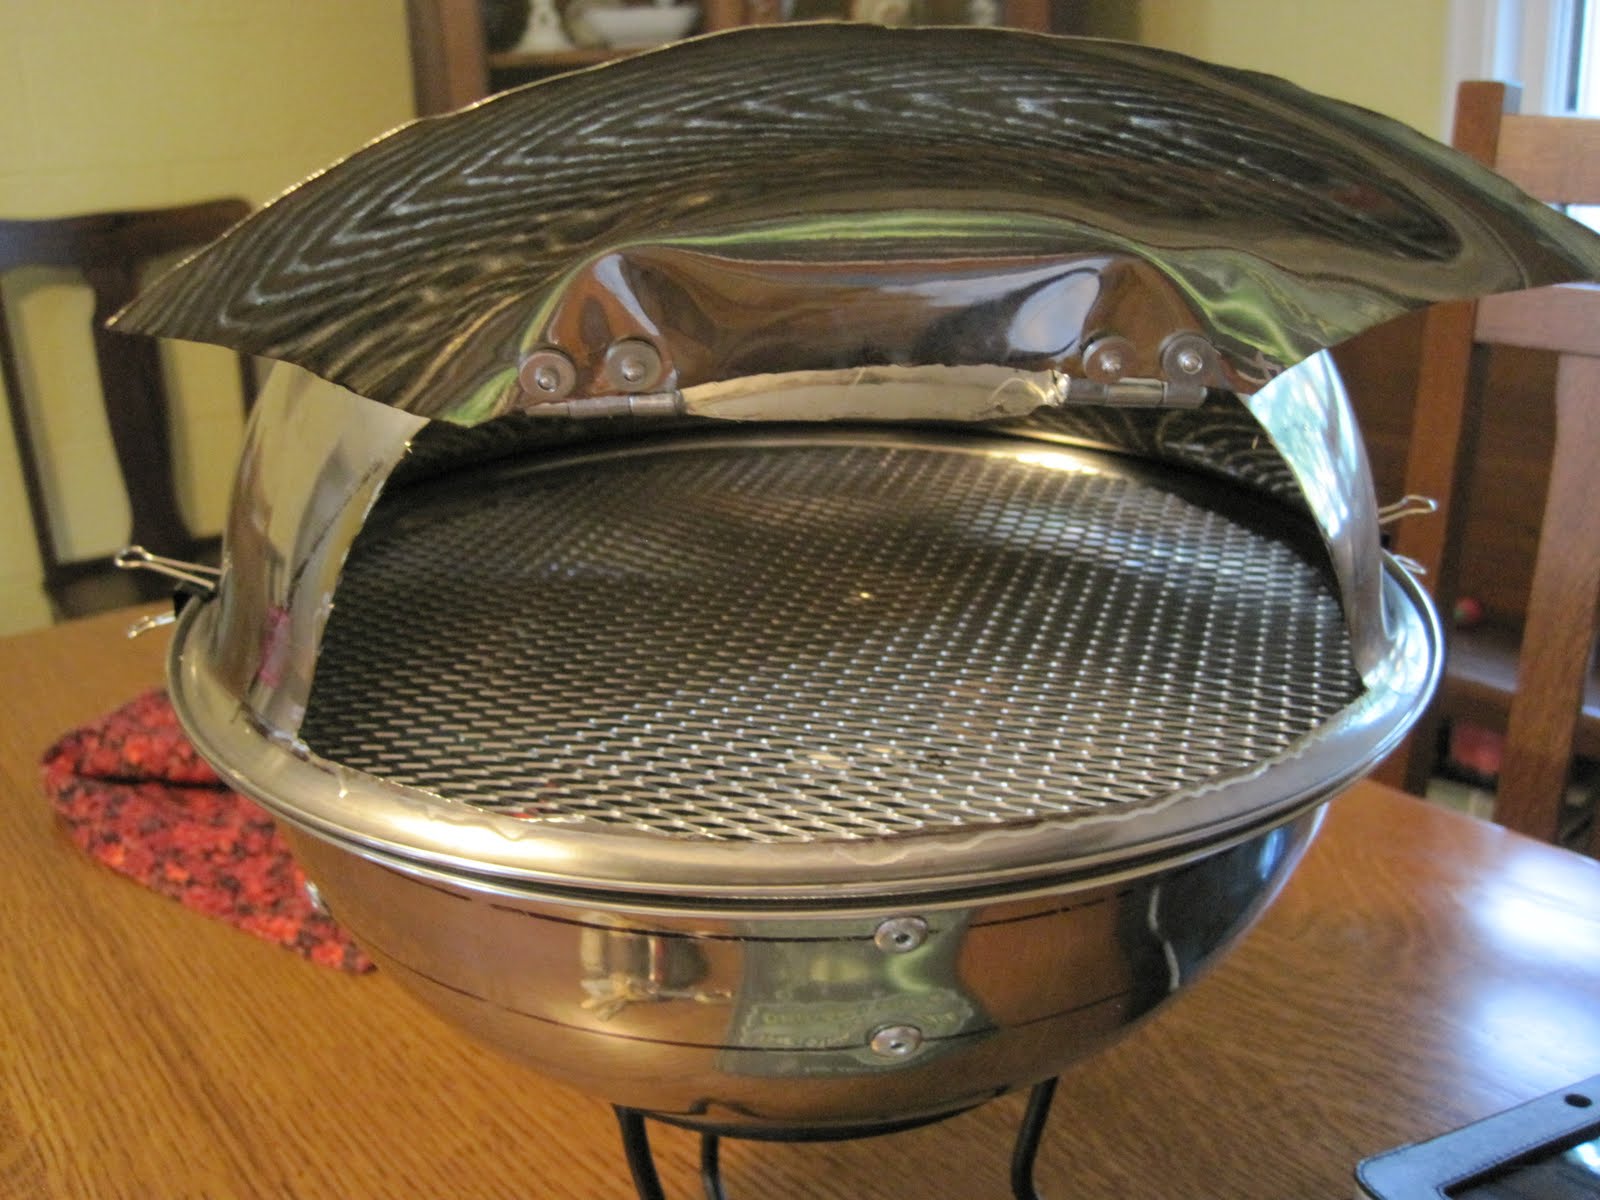 |
| The top half is affixed to the bottom with binder clips. The top half is a model of the Firedome with 1" hole vent in lid and the famous hinged door. |
 |
| Just an image of the chrome bad ass monster. The entire apparatus will be suspended in a stand above the "ground" using a plant stand. |
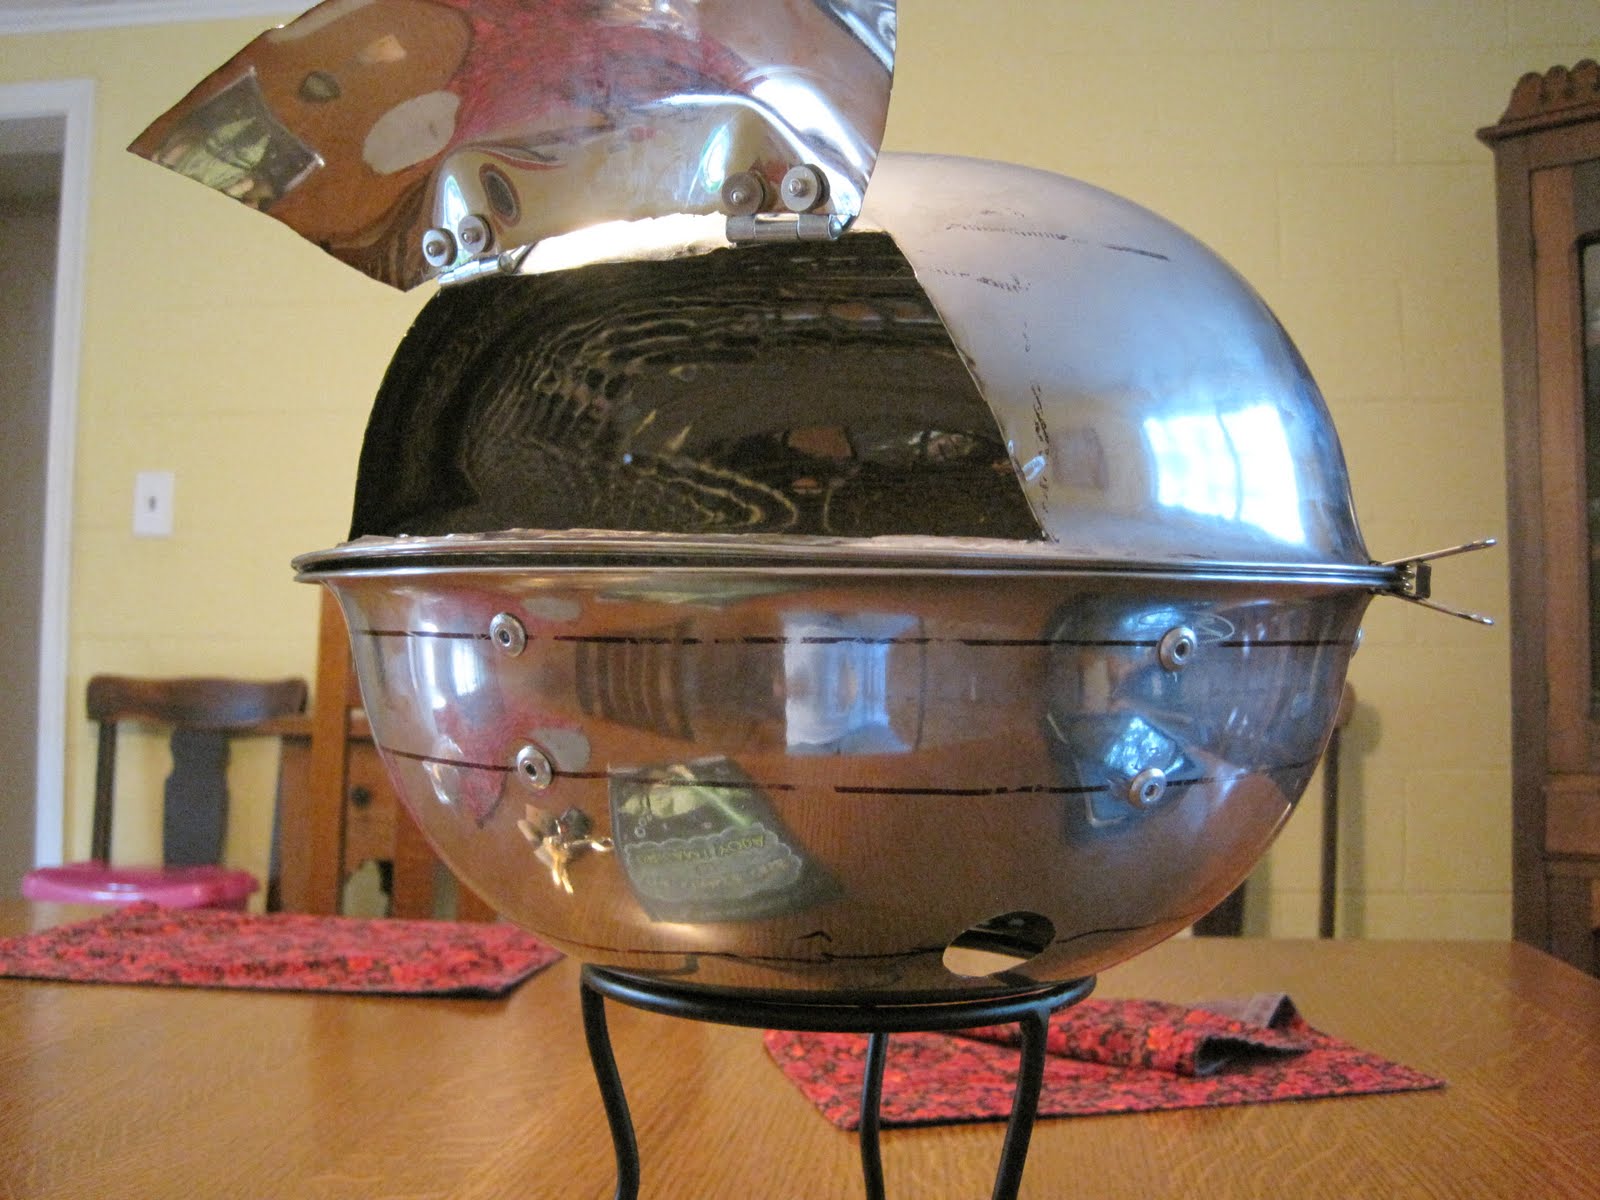 |
| The simulator sitting on a rack suspended so air can travel in through the bottom and side vents. |
Update: Not learning much, I really need a good voluminous smoke source. Incense isn't enough and it attracted hippies.
8.02.2011
Waafer thin pizza
4. The wife and kid like the thin pies too.
water, 220 g
unbleached white flour (Montana Sapphire), 300 g
sugar, 5 g
olive oil, 25 g
salt, 5 g
yeast, Red Star instant active, 7 g
Mixed, 1 rise, scaled to 150 g and rolled to 12" diameter (pretty exact)
topped with fresh thinly sliced tomato, chevre and basil, baked at 450°F

water, 180 g - all else the same
...stay tuned...
7.26.2011
7.13.2011
Simple dinner with the slow cooker
Cooked a split breast over potatoes on the kettle, indirect at about 300-350°F for 2 hours, pulled and wrapped chicken while potatoes finished up directly over coals. Wow. I wish I could've done the whole thing sloooowly, but weeknight's are weeknights.
7.11.2011
Wheat sandwich bread
I've had a love affair with soft squishy white bread since since I was about 1 [note 1]. Sunbeam was best, but Wonder was ok in a pinch. The crust is merely a darker version of the middle, it has a twinkie-long shelf life and it practically withers in the presence of moisture, but it's still a fine substrate for bolony with mustard, pb&j or sopping up bbq sauce. Y'all like it more than you'll admit.
But, it is an enigma of baking. I can buy this stuff if I want and occasionally do, but it is the challenge of recreating a recipe based on my perception and palate that drives the pursuit to duplicate it in my kitchen. More importantly, once I get the gist of the soft bread, I could elevate it to something special and that is the reason for this post. I have and I did and now I will share with you.
 |
| This particular loaf is the white bread version using cake flour. The crumb and interior is the same for the whole wheat pastry flour variant. When I get an image of the wheat, I'll replace it. |
salt, 5 grams
vegetable oil, 20 grams
sugar, 10 grams
instant active dry yeast, 1 pkt, 7 grams
unbleached white flour, Montana Sapphire, 225 grams
whole wheat pastry flour, 75 grams
Mix and knead by hand for 5 minutes or spin about 5 minutes in a bread machine's dough cycle.
Plop out and let rise for about an hour.
Preheat the oven to 375°F.
Punch down and round the dough, let rest about 5 minutes.
Form into a oblong loaf big enough to just fit in a 8.5" x 4.5" loaf pan lined with parchment.
Let rise/proof in this pan about 20-25 minutes uncovered (uncovered so the surface dries out, this will enable a cleaner slash when docking the dough) [note 4]
Slash once across the length with a knife (I use serrated) and place in oven to bake 30 minutes.
Remove from the pan and let cool on rack about 30 minutes before jumping in.
Notes:
2. When communicating a recipe, I like it to be specific so the person has a good chance of hitting the same success I did. Using a yeast with perfect integrity in a small packet is as close as I can get to a reproducible source to convey to someone conducting the prep for the first time. I have no idea how a 3 month old jar of bulk yeast will behave, nor a 6 month old, nor any other yeast. Given the rigorous specifications a company must comply with, using a small quantity with perfect airtight packaging is the best a home baker, with no micro lab, can do to insure a consistent starting point [note 3] (sorry Rachel).
3. I can almost guarantee 9 out of 10 will completely disregard my babbling on yeast, my mother is one of those 9 because she "has been baking forever." Whenever I get an email that declares the procedure "didn't work" they all admit to a significant change in the method because they felt it was unnecessary; I'm off the hook in that case, to repeat something, you must do the control or you have no argument.
4. This is a fast rise loaf. Don't over proof or the final crumb will be grainy instead of feathery. It will also have pretty darn nice oven spring. Longer rise is not always better, it depends on the loaf.

![]() 0
comments
Labels:
baking,
baking methodology,
Bread machine,
Kneading
0
comments
Labels:
baking,
baking methodology,
Bread machine,
Kneading
7.07.2011
brisket, finally
I never make brisket because it's tough to do well. I've made a couple in my day, 1 mediocre, 1 really bad, but both so long ago, I forget the details. The challenge of brisket is the long cooking time, about 18 hours with good temperature control.
Some time back I happened on the BBQ Pit Boyz video on brisket. It's over 18 minutes long and worth every minute spent watching. I was inspired. I forgot all my past attempts and ran to get myself a 6 and half pound brisket with a good fat cap. I did absolutely everything they did on the vid, so this post isn't anything more than a validation of their method. Mustard coat, good spice rub, refrigerated a few hours, set the grill for indirect, minion method, water bath (I never do water baths, and I think maybe it was responsible for the good temp control I achieved), 225-250° for 14 hours, wrapped it for 2 hours at ca. 150°F, and finally let it rest, still wrapped, for a final 2 hour rest. Started it Wednesday night and it was ready just in time for dinner Thursday. Spend the time, watch the video and make this! Thanks BBQ Pit Boyz.
 |
| Fat side up, rubbed, grill set for indirect with water pan. |
 |
| After about 14 hours cooking at 225-250F |
 |
| Just look at it! |
7.02.2011
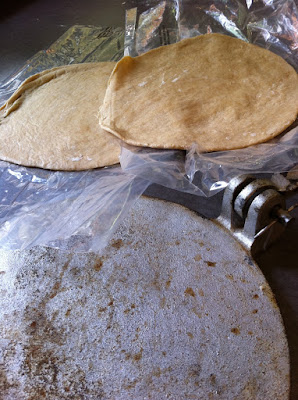
Pizza dough
Making pizza is as much about the cooking method as it is the dough. So that's the caveat with which I share this not very special prep. The baking of the pie is a little different as many will attest to.
But, many still ask for the dough prep, here's mine - and sorry, it's in grams, get an Escali [Note: this is not an affiliate link] for $20 and get over it. Weigh things when you cook, you'll be surprised how much better your intuition becomes in cooking and in everyday interactions with the world when you know a few common weights.
In addition to a balance, get a bread machine to be a dedicated kneading machine. These things are about $5 in a thrift store and they are ALWAYS in stock, the kneading is all the same and it's better than a Kitchen Aid, way better. Oh, and they absolutely suck at baking bread, hence the abundant supply in thrift stores.
To the bread machine pan add in any order:
unbleached white flour, I am dedicated to Montana Sapphire, 575 g
water, 400 g
Adriatic sea salt evaporated from the shell of a tortoise, 10 g (kidding, any salt)
olive oil, 50 g
sugar, 10 g
a pack of INSTANT active dry yeast. Don't use the bottle, don't worry about price, you're making 4 pizzas worth, don't use the bulk bottle, don't use it no matter what, instant active dry yeast, not the bulk bottle. Got it?
Set to spin on dough cycle, remove when it looks like the video:
When it's kneaded about 5-10 minutes, dump on counter, flour the ball so it won't stick and store in fridge. I cut off 1/4 of the ball, about 250 g for a 10-12" pie. This will stay in the fridge for a week or keep in the freezer for longer.
Enjoy

![]() 4
comments
Labels:
Bread machine,
Dough,
Flour,
Kneading,
Olive oil,
Pizza
4
comments
Labels:
Bread machine,
Dough,
Flour,
Kneading,
Olive oil,
Pizza
6.24.2011
Tortilla or piadina?
I haven't been thrilled with my tortillas of late and decided to search for a flour tortilla instead of masa to see if I liked them better. I found one of Bayless' many recipes. I wanted to just try a little batch to see what they were like. I made a math mistake and scaled the fat wrong, but the experiment was fun.
I cut lard (20 g, should'be been 10 g) into white wheat flour (60 g) and salt (ca. 1 g) and to this added water (40 g). The 100 g of dough was divided, rounded and pushed into squat 4" diameter disks to rest. I pushed them into ca. 8" discs using a tortilla press and tossed 'em in the fridge (fatty dough sticks, it's easier to handle when slightly chilled) and fired up my gas grill with the cast iron grate.
I cooked them a minute or so each side. We probably should've let them sit a bit, but ate them both immediately. They were really good, but a tad doughy tasting. I may not have aged the dough sufficiently before cooking.
I think these were a success, but they raise a few of questions:
1. This is essentially the same recipe (only white, not wheat flour) as the Piadina of Emiglia-Romagna. Piadina were graciously served to us by dear friends some time ago and I'm not sure if they taste similar because it was long ago. I'll be consulting with them soon when I remake these.
2. Are they satisfactory tortillas? Again, I think they have to be repeated with unbleached white.
3. Are they good? Heck ya, no matter how they're used, they were good. I'm still not sure if this is the way I want to cradle my taco fillings though. Again, precooking resting is in order as is the use of white flour.
Here's a couple images of the pressed out tortillas and final cooked product:

6.21.2011
Guest blogger Frankie: On the international appeal of meat and potatoes (and cheese)
Relaxing at her Clintonville ranch, Frankie talks about tonight's casserole and the bigger scene in simple foods.

Not creme de menthe
Me: When did you get the idea to prepare and serve us Tater Tot Casserole?
Frankie: Yesterday at camp (Kids in the Kitchen, OSU's Camp Recky) we made it and split 1 casserole for two tables. We had 2 or 3 tables and 1 piece each and you won't believe how good it is!
Me: How much cheese?
Frankie: A lot! We used the whole bag yesterday.
Me: What goes in first?
Frankie: First the meat, then the tater tots and then cheese and then it's cooked.
Me: Should I cook the meat first?
Frankie: Yes and I'll put it together.
Me: [meat is browned and Frankie places it in an even layer in the baking pan] How many tater tots go on top?
Frankie: Rows of 5 until it's filled, then tons of cheese.
Me: Toss it in the oven.
Frankie: No you, it's too hot for me [I toss it in].
Me: Do French kids eat tater tot casserole?
Frankie [exasperated]: I don't know, and could you make me a bigger lunch for tomorrow?
Me: Peanut butter, jelly then peanut butter?
Frankie: Duh.
Me: Got it.

Voilá
Fin
5.29.2011
petite brioche
In four acts, here's our breakfast brioche. Recipe is here, only this time I baked at 375°F and used half white wheat and half unbleached white. I like all unbleached white better. This time I was testing out my mini parchment scheme. It worked swimmingly. Despite the yolk glaze dripping below to the bottom of the breads, no stick to the paper. All popped out. Here's a few images of the morning.

The dough had been in the fridge yesterday and taken out last night at 11 to warm up all night on the counter. The dough was scaled to 60 gram pieces, rounded and plopped in for a 20 minute proof.

After their proof, a painted yolk glaze.

After about 25 minutes at 375°F.

5.28.2011
mini molds
Ah, I remember why I don't make brioche much. When I do the final glaze, the glaze drips below the edge of the bread into the loaf pan and makes the bread stick. When a beautiful loaf comes out of the oven, nothing is more anger-provoking than that kind of complication. So, a better mold - a mini too. I like to make small breads to share, especially such rich ones.
I recently tried cupcake wrappers, but these suck for breads, they don't release. Here's my yet untested solution. Wish me luck. Parchment never fails, it always releases a bread. I'm going to line my little muffin trays for the loaves tomorrow morning.


![]() 2
comments
Labels:
bread,
Bread pan,
Brioche
2
comments
Labels:
bread,
Bread pan,
Brioche


