Showing posts with label baking methodology. Show all posts

7.11.2011

Wheat sandwich bread

I've had a love affair with soft squishy white bread since since I was about 1 [note 1].  Sunbeam was best, but Wonder was ok in a pinch.  The crust is merely a darker version of the middle, it has a twinkie-long shelf life and it practically withers in the presence of moisture, but it's still a fine substrate for bolony with mustard, pb&j or sopping up bbq sauce.  Y'all like it more than you'll admit.


But, it is an enigma of baking.  I can buy this stuff if I want and occasionally do, but it is the challenge of recreating a recipe based on my perception and palate that drives the pursuit to duplicate it in my kitchen.  More importantly, once I get the gist of the soft bread, I could elevate it to something special and that is the reason for this post.  I have and I did and now I will share with you.


This is a straight dough method, mixing, rises and proof is as described in  Wayne Gisslen's Professional Baking.  Basically toss all ingredients in and mix and knead.  The big break in this loaf is the use of a softer (lower protein) flour to to blend with the unbleached white to afford a softer loaf.  Note: My preferences are to use a scale to weigh ingredients, a bread machine to knead, and I use instant (aka fast rising, any brand except Kroger) active dry yeast [note 2].


This particular loaf is the white bread version using cake flour.  The crumb and interior is the same for the whole wheat pastry flour variant.  When I get an image of the wheat, I'll replace it.


Preparation:
Add the following, any order to the chamber of a bread machine or a bowl:
water, about room temperature, 180 grams
salt, 5 grams
vegetable oil, 20 grams
sugar, 10 grams
instant active dry yeast, 1 pkt, 7 grams
unbleached white flour, Montana Sapphire, 225 grams
whole wheat pastry flour, 75 grams

Mix and knead by hand for 5 minutes or spin about 5 minutes in a bread machine's dough cycle.
Plop out and let rise for about an hour.
Preheat the oven to 375°F.
Punch down and round the dough, let rest about 5 minutes.
Form into a oblong loaf big enough to just fit in a 8.5" x 4.5" loaf pan lined with parchment.
Let rise/proof in this pan about 20-25 minutes uncovered (uncovered so the surface dries out, this will enable a cleaner slash when docking the dough) [note 4]
Slash once across the length with a knife (I use serrated) and place in oven to bake 30 minutes.
Remove from the pan and let cool on rack about 30 minutes before jumping in.

Notes:
1. I was raised on great bread; Esposito's scali was the staple in our house.  A thin-sliced scali with mortadella and fine hams was how we survived, but since I was one of 4 hungry kids, my mother used white bread when necessary to fill the bellies of the masses.


2. When communicating a recipe, I like it to be specific so the person has a good chance of hitting the same success I did.  Using a yeast with perfect integrity in a small packet is as close as I can get to a reproducible source to convey to someone conducting the prep for the first time.  I have no idea how a 3 month old jar of bulk yeast will behave, nor a 6 month old, nor any other yeast.  Given the rigorous specifications a company must comply with, using a small quantity with perfect airtight packaging is the best a home baker, with no micro lab, can do to insure a consistent starting point [note 3] (sorry Rachel).

3. I can almost guarantee 9 out of 10 will completely disregard my babbling on yeast, my mother is one of those 9 because she "has been baking forever."  Whenever I get an email that declares the procedure "didn't work" they all admit to a significant change in the method because they felt it was unnecessary; I'm off the hook in that case, to repeat something, you must do the control or you have no argument.

4. This is a fast rise loaf.  Don't over proof or the final crumb will be grainy instead of feathery.  It will also have pretty darn nice oven spring.  Longer rise is not always better, it depends on the loaf.
Enhanced by Zemanta

10.31.2010

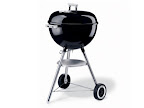
Firedome: A new and easier fuel configuration, indirect - still a work in progress

Warning:  Long post (with water balloons)

What seemed correct with the Firedome to date was a symmetrically placed ring of fire about the cooking surface.  It's served me (and friends) well for over a year now, but a few lingering flaws forced me to persist in its development.

1. briquettes are good, but lots of byproducts and I could not boast "wood fired" to a more discerning crowd. I wanted to switch to wood. Something easier and cheaper to use and recharge on the fly without a mid-burn disassembly.
2. A wood fire would be hard to maintain in a circular configuration.
3. Any good pizza oven I've observed has the fuel source "indirect," not directly below the food, but in a pile offset.
4. I have a continuous stream of wood on my property.  Oaks give it up every time it's windy (remember Ike?).
5. One pile of fuel is trivial to start; a ring is often a pain.
All modifications must still result in uniform cooking top and bottom of the dough.

Today the wood fuel vision begins to come into focus; I think we might be hitting the oven that was intended in the first place.

A chilly morning seemed the perfect time for a fire and it's always a good time for lightly smoke-infused flatbread.  Made some dough, fired up a chimney of briquettes (briquettes are a killer starter for any fire by the way).  After  a few clumsy reorganizations, I placed the fuel on one side of the lower grate of the Firedome, placed the cooking surface on the upper grate and positioned the clay cooking surface on the opposite side of the grill.  On top of the briquettes, I placed several pieces of oak, they started immediately, a kick ass fire in minutes.  I capped the dome, lifted the door, positioning the opening so the blazing fire was on the right and the cooking surface to the left.

Here's how the morning progressed in a few frames and a few movies:

The circle of fire is ok, but laborious to maintain. Also!.. note the decorative chimnea stand I scored in someone's trash. Elegant? I think so.


This was shot after I moved everything to either side.  In this way, I could add to the fire by pitching wood right through the door as I need.  The flames would swoop around and I'd be cooking "in the tube" of the firewave.  It also tolerates water balloons tossed in when you need that extra bit of humidity.


Final product.  To be eaten with tonight's roasted red pepper hummus.
I'm waiting for a replacement thermocouple or this post would've been oozing with temp data.  However, a pita cooked in about 90 seconds.  I'm guessing the oven was about 750°F while the flames were up, maybe a bit higher.    There will definitely be more to come on this.

Final notes for those following along with your own pet Firedome:
1. one chimney full on one side of the lower grate
2. add small, ca. 8" logs of wood, on the briquettes
3. place upper grate in place with one side of the grate open in a way you can toss wood in
4. place Firedome on top of roaring fire with the hatch open, wait a few minutes and cook away
5. getting some wood this size might require a chainsaw
Enhanced by Zemanta

1.14.2007

The Results

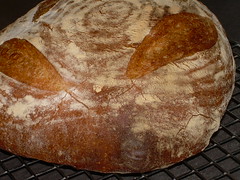
Peforated Pan/Brotform Loaf In yesterday's post, I babbled about the opportunity to use of this nifty new pan and bannetton I was using to bake a boule with nice volume and crackly crust.

Although, my recipe was only a quick rise dough, the results were very nice. The crust, initially was crackly and the interior tender; after cooling, because it was slightly enriched (with olive oil and honey), the crust became softer but still maintained some tooth.

The real victory of the day came using these tools and this kneadless process. I've been somewhat obsessed ever since I watched this video and I had an amazing success story yesterday. When I get reproducibility on it, you'll be the first I tell. I used the recipe, but my own cooking method.

1.13.2007

On humidity, perforation and the Brotform

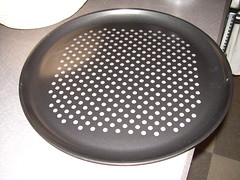
Perforated thin panbrotform
It's about frigging time for a new post. Giada's nuts was a good chuckle, but it's time to move on.

Historically, I've had problems achieving good crackly crust on anything but my baguette. I think it's primarily an issue of humidity attacking the new loaf on all sides in the oven when the yeast is experiencing its final gasp of life (a.k.a. oven-spring). The perforated baguette pan simply allows the steam to hit the loaf from the bottom (and all other sides are simply exposed, so they get it too). Today's experiment involves the application of a perforated, thin, flat pan I found the other day at good 'ol Giant Eagle. ANY size loaf could fit on this thing and best of all, you don't need stones in the oven or a peel to get the loaf in and out. This thin pan, I hypothesize, should heat up quickly and permit my steam shot (ca. 60 - 120 mL water, tossed into the hot oven floor or squirted from a bottle) to completely bathe my loaf in steam, regardless of shape, producing a crackly mosaic of crust surrounding a tender inside (a.k.a. "Papa's good bread" Frankie calls it and I stand proud).

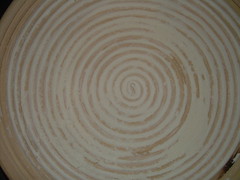
Additionally, since I'm making a boule today (a round bread), I'm using a nifty item my love bought for me a year ago called a Brotform (2nd image). It's a bamboo-like bowl used for the final proof. There's surprisingly little (I've found) on the web for using these. Do they need extensive seasoning/use? Is a slack dough going to stick? I'll be exploring these and other questions in weeks to come.

Today's recipe is not a good control. It's not the simple baguette recipe; there are a lot of variables tossed in. Life is simply too short for rigorous factorial experimental design everytime you need some bread. So phthththth. And, I need this for dinner at Amy and Mario's tonight!

My recipe for today is:

water, 250 g
honey, ca. 1 T
olive oil, 1 T
Montana Sapphire unbleached white, 375 g
rapid rise yeast (Fleischmann's), 1 packet
salt (not kosher), 7 g

First kneading and rise in the bread machine (my kitchen slave), 2nd rise will be about 20 minutes and the final proof somewhere around 20 minutes (cold kitchen today, we'll deal with the final proof when it comes). Baking will be at 450-deg-F (convection) until deep golden color. I'll post the results.