Showing posts with label Briquette. Show all posts

10.31.2010

Firedome: A new and easier fuel configuration, indirect - still a work in progress

Warning:  Long post (with water balloons)

What seemed correct with the Firedome to date was a symmetrically placed ring of fire about the cooking surface.  It's served me (and friends) well for over a year now, but a few lingering flaws forced me to persist in its development.

1. briquettes are good, but lots of byproducts and I could not boast "wood fired" to a more discerning crowd. I wanted to switch to wood. Something easier and cheaper to use and recharge on the fly without a mid-burn disassembly.
2. A wood fire would be hard to maintain in a circular configuration.
3. Any good pizza oven I've observed has the fuel source "indirect," not directly below the food, but in a pile offset.
4. I have a continuous stream of wood on my property.  Oaks give it up every time it's windy (remember Ike?).
5. One pile of fuel is trivial to start; a ring is often a pain.
All modifications must still result in uniform cooking top and bottom of the dough.

Today the wood fuel vision begins to come into focus; I think we might be hitting the oven that was intended in the first place.

A chilly morning seemed the perfect time for a fire and it's always a good time for lightly smoke-infused flatbread.  Made some dough, fired up a chimney of briquettes (briquettes are a killer starter for any fire by the way).  After  a few clumsy reorganizations, I placed the fuel on one side of the lower grate of the Firedome, placed the cooking surface on the upper grate and positioned the clay cooking surface on the opposite side of the grill.  On top of the briquettes, I placed several pieces of oak, they started immediately, a kick ass fire in minutes.  I capped the dome, lifted the door, positioning the opening so the blazing fire was on the right and the cooking surface to the left.

Here's how the morning progressed in a few frames and a few movies:

The circle of fire is ok, but laborious to maintain. Also!.. note the decorative chimnea stand I scored in someone's trash. Elegant? I think so.


This was shot after I moved everything to either side.  In this way, I could add to the fire by pitching wood right through the door as I need.  The flames would swoop around and I'd be cooking "in the tube" of the firewave.  It also tolerates water balloons tossed in when you need that extra bit of humidity.


Final product.  To be eaten with tonight's roasted red pepper hummus.
I'm waiting for a replacement thermocouple or this post would've been oozing with temp data.  However, a pita cooked in about 90 seconds.  I'm guessing the oven was about 750°F while the flames were up, maybe a bit higher.    There will definitely be more to come on this.

Final notes for those following along with your own pet Firedome:
1. one chimney full on one side of the lower grate
2. add small, ca. 8" logs of wood, on the briquettes
3. place upper grate in place with one side of the grate open in a way you can toss wood in
4. place Firedome on top of roaring fire with the hatch open, wait a few minutes and cook away
5. getting some wood this size might require a chainsaw
Enhanced by Zemanta

3.17.2009

Weber kettle mini minion method temperature profile for long burn
UPDATED with lots more tedious graphs!

While a scientist in industry, my toughest challenge was doing a control experiment. Receiving a procedure for development, the immediate urge is to read through it and start tweaking and changing immediately. That urge continues to this day. It's more exciting to try to improve things than start with a baseline/control.

I'll dispense with tedious details, but I've never done the mini minion method properly. Finally, I did. I've been wanting to let my kettle go overnight forever.

It's better to start these long cooking sessions the night before dinner. If started in the morning, cooking time can run short. If the meat's done a couple hours early, just wrap it up and no problems.

Here's few clean control runs.
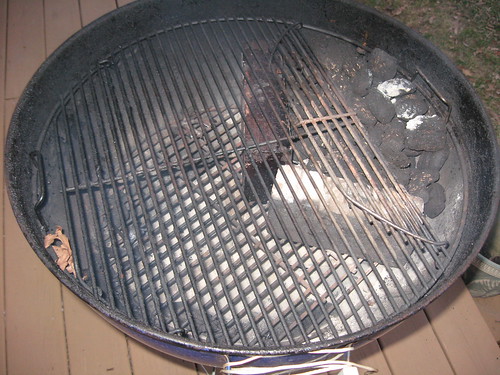
1. The top image is a simple indirect setup; briquettes banked against the side using bricks to keep them in place.

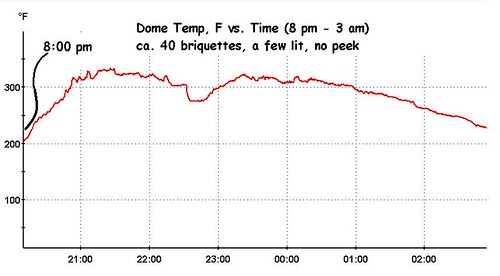
2. The second image is the temperature profile using Kingsford's mesquite briquettes. I'm able to achieve a steady 200+ temp with a max around 320°F (acceptable) for 7 straight hours using only about 40 briquettes. Nice. No waking up at 3 am if I start at 11. Kettle has slightly opened vents on the bottom and half open vent on top.

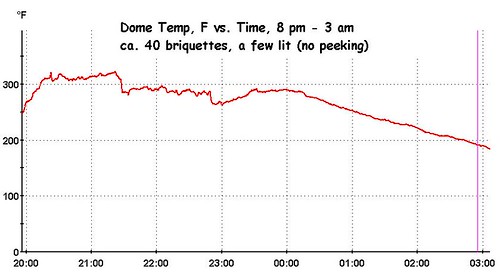
3. The next is a run with nearly identical conditions to #2 but using "natural" Kingsford Competition briquettes. A tad less residual ash, but nearly identical temperature profile.

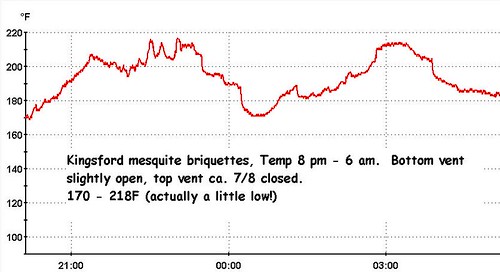
4. The 4th image shows one more run using a nearly closed top vent, everything else the same. This is pretty fascinating (to me). I've always had a hard time maintaining LOW temps with the kettle. In this case a relatively steady and controlled 195 ± 20°F is maintained for 10 straight hours using only about 40 briquettes. For low 'n slow, I actually need the top vent opened somewhere in between. That run will commence Saturday night when I cook beans beneath the brisket.

Sunday night's dinner will be a celebration of these efforts.

Indirect and ready to go
My standard indirect setup

lownslow
About 40 Kingsford mesquite briquettes, a few lit, ca. 7 hr. burn


lownslow K-competion
This run is with Kingsford Competition Briquettes, same conditions overnight


low 'n slow 20 Mar
Another run with the top vent shut down more.
This run has an expanded Y-axis, temp was actually pretty stable over time.
Enhanced by Zemanta