11.23.2008

Weber Kettle Modification: Firedome (Part 2)

IMG_1806 IMG_1807
IMG_1808 IMG_1810
IMG_1811 IMG_1813


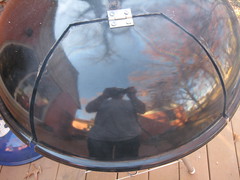
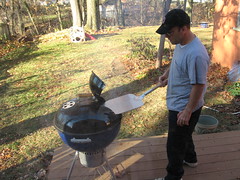
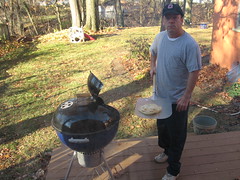
Image 1: This is the dome of a 22.5" Weber Kettle Grill. I took a grinding attachment and my power drill to cut out a door. I have some additional images of this fabrication I'll post later. I also put a shutter hinge on it to keep it attached. The idea was to heat up the grill and place a pizza in it without having to remove the entire lid and lose heat. Ideally, the dome should be shaped like an igloo. Need a welding friend to pull that one off.

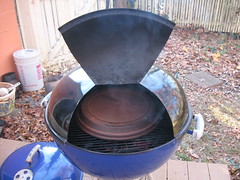
Image 2. Lid up and inside is an inverted saucer from a flower pot; it's made of unglazed quarry tile. Upon heating the inside to 500°F+, it cracked once. Still fine to cook on. It's diameter is 12" on top. The heat source is lump charcoal and I decided to try it direct. The pile of fuel is directly beneath the clay. I thought since the clay surface is so thick, I might not need indirect. I think I'm wrong on that. Another day.

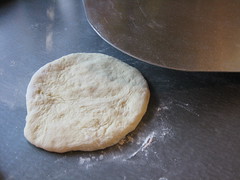
Image 3. This is an 8" diameter or so piece of pizza dough. It's kind of squat and about 150 grams. This dough had been thawed only about 3 hours. It was frozen and I made it a couple weeks ago.

Image 4. Notice the hinged door was made wide enough to accomodate the peel. I flipped up the door and tossed in the dough. I used a little flour for the dough to slide on. I closed the lid and waited about 2 minutes. I didn't use any fancy temperature measureing devices, but I do know the air above the tile surface was much greater than 500°F.

Image 5: After 2 minutes on one side, I removed the shell and flipped it on the peel and slid it back in for another 2 minutes.

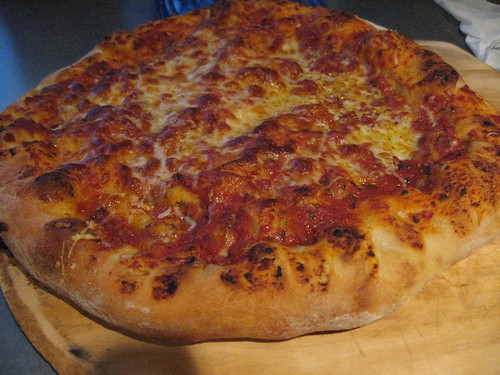
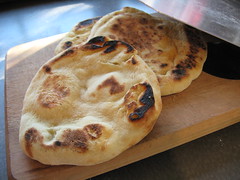
Image 6. The final product. Click image for a better view of this beautiful flatbread.

Conclusion. I think this setup, as is, will not cook a pizza properly. I need to find a means of heating so the top and bottom cook at approximately the same rate. I'll try distributing the fuel all about the edge of the grate below and try to achieve better convection. So far though, I pretty damn good pita. Breads were gone pretty fast.

• Complete set on Flickr, including more of the dome cutting details.

11.21.2008

honey wheat crust


honey wheat crust, originally uploaded by Seligmans Dog.

Dual posted from Flickr for the the podcast I have tonight with Jim and Andrew.

This was originally to be a honey wheat kneadless boule. It did the first rise overnight for 12 hours, punched down and let proof most of the day today. When dinner rolled around, it's fate changed from a boule to a pie. 600 g into a 15" pie (3.4 g/in.2). I usually make a thinner crust (225 g/11" or 2.4 g/in.2).

I love thick pizzas but the wife doesn't. When she's away, we have the thick crust. Yum! (click on the img for a few comment discussion)

11.16.2008

Hi Honey, we're eating well, don't worry.


Dinner, originally uploaded by Seligmans Dog.

It's rare that I give in to the failure that is the grilled cheese dinner. With Mom away, prep for demos in Frankie's class on Monday, leaves and gymnastics on Sunday, etc. etc. I caved in last night. This was our dinner.

It's a failure to me. The kid thought I was a god.

11.11.2008

How many times can a lump of dough rise?

A while back, I was making pizzas for our playgroup. I made about 14 that time. I actually made a bunch more dough than I needed. I was ready to make about 26. At the end of the day, I was going to pitch the remaining dough. It had already risen 3 times; 1 rise overnight, 1 rise during the day and 1 rise during pizza making. Andrew encouraged me to just round it and toss it in the freezer.

Big question: Should I take a chance and try reusing the dough. Everyone's sitting around the dinner table and I'm going to use it - after I allow it to thaw during the work day (it's 4th or so rise). Will I be serving them a beauty of a pie or an unleavened cracker-like pizza. Here's the final product - oops, none left to photograph.

I don't know technically how to determine when the yeast has run out of food and the dough turns into mush, but, empirically, it's still going strong after 4 times. A very cool observation in this don't-waste-a-damn-thing economy. Thanks for the tip Andrew.

11.06.2008

Weber Kettle Modification: Firedome, (Part 1)

In the time-honored tradition of leaking communications inevitably to be republished in the form of a full disclosure, I present the first installment of the Weber Kettle modification. Firedome.

Some months ago, in an attempt to get my kettle grill to cook low 'n slow (ca. 225°F overnight with little or no attending, I tried taking advantage of a chimney starter's cylindrical shape to deliver urburned fuel to the heat source at a slow rate. It didn't work. That failure, however led to an interesting observation. Even if a single lit lump of fuel is placed on top of an unlit mass of fuel in a chimney starter, within a few minutes, the entire mass is ignited. The chimney is aptly named. It is the fastest means of initiating and maintaining fuel combustion.

With an entire chimney full of lit fuel, it was really hot. More so than a small equivalent mass of fuel placed on the lower grate of the kettle in a mound.

The heat source for this project will be contained, inside the kettle, in a chimney.

Upcoming:
-type of fuel
-Weber Kettle modification (you will need a grinder with a steel-cutting disc).
-Cooking surface
-Dry run temperature data
...
-Should be a fun series. Stay tuned.

11.05.2008

New Weber Kettle Mod coming soon


tossing dough
A friend invited us for pizza the other night. They had a real live pizza oven. It was 800°F once fired up. I have found a new obsession.

I have started sketching out ideas for a modified Weber Kettle so I too can have a domed pizza oven that can achieve 800°F. That's pretty frigging hot. I'm not even sure if the old reliable kettle is spec'd for that kind of temperature, but we'll see. With my home oven running at 550 and convection, I can get 600 pretty steady. The extra 200 is going to be challenging. Keep you posted when I get some pilot data.

11.01.2008

Aubergine, to salt or not to salt?

roasted eggplant
Roasted eggplant slices on the baking sheet
My favorite preparation of eggplant is roasting or grilling thickly-sliced rounds. There are two prominent schools of thought among auberginophiles. Some salt, some do not. Salting, it's touted, is the way to remove bitterness. Not salting is the method of the lazy Philistine who can't tell the bitterness has been removed (me).

I am now a salter. Last night was salad night. A bed of greens topped with aldente, fenugreek-laced puy lentils, some Egyptian-style feta on the side and a grilled veggie on top; dress the salad and it's dinner time.

Busily speeding around the kitchen the other night, I sliced the eggplant and decided to give salting a try. A heavy brine is the fastest way to brine anything in the shortest time. Don't mean to be arrogant, but I don't need a 30-comment rambling thread on Chowhound to be convinced of the proper method. This is a matter of chemistry. And, I'm right.

I immersed the slices in the brine beneath a heavy plate (the brine was made from about 1/2 C salt and a couple cups of water). They stayed submerged about 15 minutes.

Here is a really big sentence because I'm in a hurry:
The slices were rinsed,
dried by paper towel,
tossed in oil [the first difference observed immediately, the oil coated the eggplant, the oil didn't get sucked into the flesh],
peppered (salt from the brine),
tossed into a single layer on a sheet pan and roasted for 20 minutes at 400°F/convection, no flipping.

WOW! My complaint with not salting and roasting (aside from the oil thing) is the texture - real mushy. The texture this time (and it should've brined longer) was tighter and more dense. It crisped well too because of the even coating of oil.

If you're not a salter - go ahead and try it.