3.24.2009
A Shrine to the Almighty Weber
Behold, the godly force guiding my kettle's thermal control. I had a stellar brisket run this weekend. I've never done one very well before. I cooked my 4 lb baby fat side up for 12 hours at 200°F, then turned it up a notch and cooked it 5 hours at 240-260°F to a finished internal of 185-190°. I wrapped it for an hour while I clobbered the family in Scrabble. Zag is a word you know.
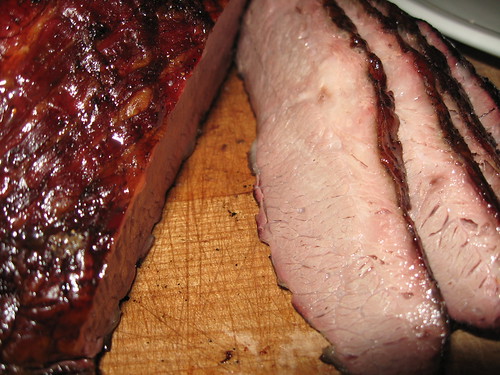
The brisket was sublime. After being sliced, it seemed to taste more like roast beef than brisket. Not fork tender, still had some texture; damn good. I'm a dedicated pulled pork fan, so my palate for brisket isn't too well developed. I think it was good though.
Too bad the dog's stomach didn't tolerate it so well. I will not provide details. Below is a pic of the succulence that was the highlight of our dinner.
3.22.2009
Action shot
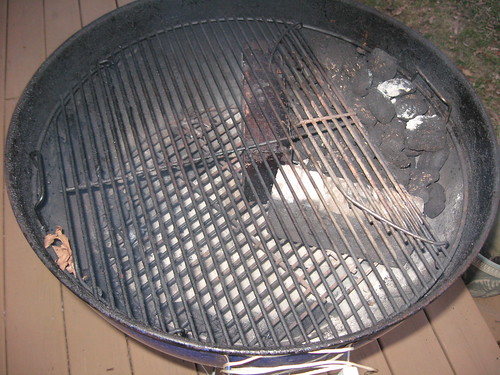
The quick version of my kettle long slow burn solution:
1. bunch of briquettes banked on the side for indirect
2. light a few on top (I use a propane torch)
3. bottom vent barely open
4. top vent ca. 1/4 open
=> For 40 or so briquettes, easily 7-10 hours
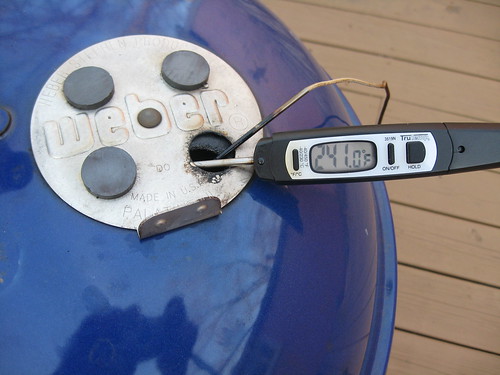
In this shot, I'm using magnets to shut down 3/4 of the top vent. Tonight, we eat. Anyone know best internal for brisket?
3.17.2009
Weber kettle mini minion method temperature profile for long burn
UPDATED with lots more tedious graphs!
While a scientist in industry, my toughest challenge was doing a control experiment. Receiving a procedure for development, the immediate urge is to read through it and start tweaking and changing immediately. That urge continues to this day. It's more exciting to try to improve things than start with a baseline/control.
I'll dispense with tedious details, but I've never done the mini minion method properly. Finally, I did. I've been wanting to let my kettle go overnight forever.
It's better to start these long cooking sessions the night before dinner. If started in the morning, cooking time can run short. If the meat's done a couple hours early, just wrap it up and no problems.
Here's few clean control runs.
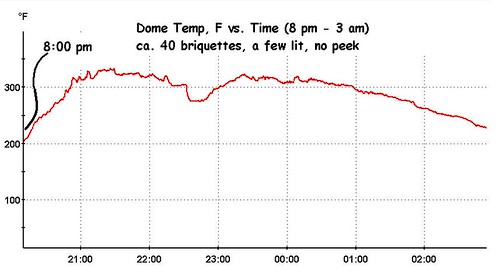
1. The top image is a simple indirect setup; briquettes banked against the side using bricks to keep them in place.
2. The second image is the temperature profile using Kingsford's mesquite briquettes. I'm able to achieve a steady 200+ temp with a max around 320°F (acceptable) for 7 straight hours using only about 40 briquettes. Nice. No waking up at 3 am if I start at 11. Kettle has slightly opened vents on the bottom and half open vent on top.
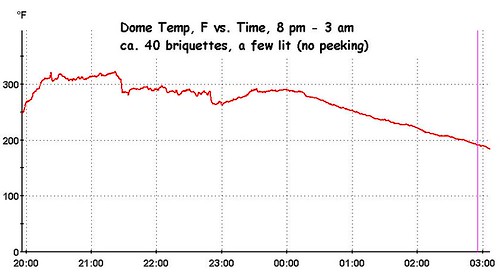
3. The next is a run with nearly identical conditions to #2 but using "natural" Kingsford Competition briquettes. A tad less residual ash, but nearly identical temperature profile.
4. The 4th image shows one more run using a nearly closed top vent, everything else the same. This is pretty fascinating (to me). I've always had a hard time maintaining LOW temps with the kettle. In this case a relatively steady and controlled 195 ± 20°F is maintained for 10 straight hours using only about 40 briquettes. For low 'n slow, I actually need the top vent opened somewhere in between. That run will commence Saturday night when I cook beans beneath the brisket.
Sunday night's dinner will be a celebration of these efforts.
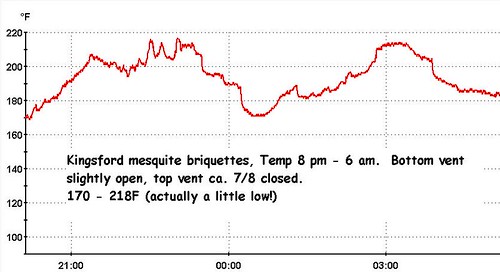
Another run with the top vent shut down more.
This run has an expanded Y-axis, temp was actually pretty stable over time.
Related articles
- How to make Charcoal Briquettes (catmontree.wordpress.com)
- Know Which Charcoal to Choose for Grilling [Weekend] (lifehacker.com)
3.15.2009
Wort aeration with paint mixer.
3.13.2009
Eating these, I grossed out my 5-year old
I've been reading SproutPeople.com lately. Very cool site to buy sprouting gear. They also give plenty of information to sprout using a common glass jar too. I made these mung bean sprouts starting last Sunday night. I sampled a few sprouts every day and I'm afraid I halted the sprouting process a bit too late.
From day 1 through 3, they were more sweet. I grew them one more day and they were still good, but just lost some sweetness. They're really tasty and great for midday snacks (almost as good as Cheeze Its from the vending machine).
Give sprouting a shot. Any legume or grain will do. I'm currently working on lentils (a mix) and garbanzo sprouts. Mung were good though. I'll be doing them again.
3.10.2009
Perforated Al° SHEET, nice run.
In my previous post, I discussed my new perforated aluminum sheet as an attempt to get my baguette closer to an authentic baguette's specifications.
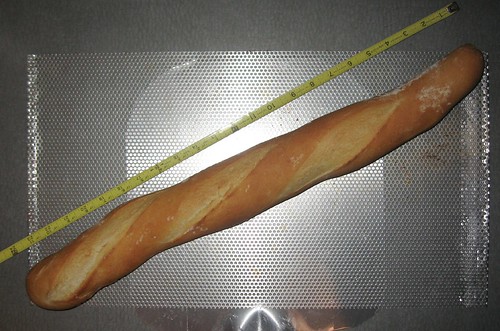
Here's my first attempt. Using the diagonal of the sheet, I was able to get 24" and 400 g (a real baguette is minimum 30" and 250 grams, so it's way off, but closer). It looks nice despite the vents on top not being quite right.
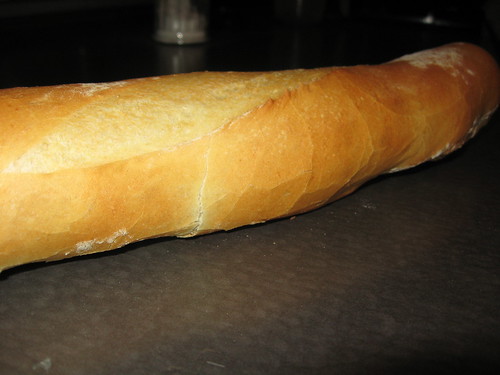
Check along the crust too, the characteristic crackled mosaic-like crust is spot on. Lots of surface exposed on this. Looking forward to breakfast.
Some notes to readers and myself:
1. The baguette pan need not be in the scooped shape, the flat sheet still makes the loaf pop (oven spring) when it hits the oven. I always suspected this was because of the steam getting through the perforations in the sheet. I'm more convinced this is the reason now.
2. I look forward to making a killer sheet pizza using this. No shoving the thing on and off a peel.
3. The sheet stores better than any pan I have.
3.09.2009
Perforated Al°
I can't find the reference, but I read somewhere the specifications for a baguette include a weight (around 300 g) and a length around 30". The baguette shape maximizes the ratio of surface to volume, thus achieving maximum crust on a loaf. What adults like and kids don't (we toss 'em the middles).
Most 30" wide ovens have an available width of 22". Most baking sheets are only 15". While I could cook on the hypotenuse to get my full 30" baguette, it'd be a pain. However, if I could find a pan, I could easily get the 22" length. A great improvement over the standard sheet/baguette pan.
I was searching Amazon the other day and actually found items listed under "perforated aluminum." I bought a sheet of 12x24". Didn't know if the holes were the right size or if it was too thick, just took a chance, $12 + $7 shipping. I got it today and it's kind of thin, but has adequate stiffness to serve as a nice pan. The holes are about the same size as my baguette pan. I crimped the edges to shorten it a couple inches so it'd fit in my oven. I could easily cook a couple loaves side by side.
I'm giving it a use test tonight. I have a 500 g (pre-baked) piece of dough and it'll be out tonight. Can't wait.
3.08.2009
Can I get a simple breakfast in Columbus that's healthy and inexpensive?
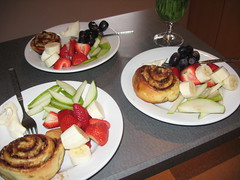 This morning I was puzzled by what to serve for breakfast. Tired of cereal and we've eaten out too much lately. I went shopping around 6 this morning, just in time to get the usual shitty choice of Giant Eagle produce. Wanting to stay close to home to get the food backfired again.
Trying to make the best of it, I got some strawberries, d'anjou pears and a few bananas; standard year 'round choices. We also had some Mrs. Davesbeer's famous cinnabon rolls - much better than the real thing. In a few minutes I had diced up the strawberries and sweetened them with a trace of sugar, soaked the sliced pears in a bit of acidulated, sweetened water to keep them crisp and bright, tossed a few small banana slices in and some grapes. A nice balance for our decadent treat of the cinnamon roll.
Pretty mediocre meal but nice, simple and really inexpensive. So, my question is, Why can't I find anything like this in Columbus? Northstar has wonderful food, but a light meal for 3 is about $20-$30. Clearly for the child-free or 150-200K demographic. Other establishments give toxic fruit servings stinging with citric acid saturation and days old or, if it's fresh, a couple crappy pieces of greenish melon - yeah, that's Panera's $3.50 "fruit" cup. I don't hate the standard fatty b'fast fare. I like it too much. I just can't figure out why we can't get something like what I served inexpensively.
Please leave any tips in the comments - thanks.
