The quick version of my kettle long slow burn solution:
1. bunch of briquettes banked on the side for indirect
2. light a few on top (I use a propane torch)
3. bottom vent barely open
4. top vent ca. 1/4 open
=> For 40 or so briquettes, easily 7-10 hours
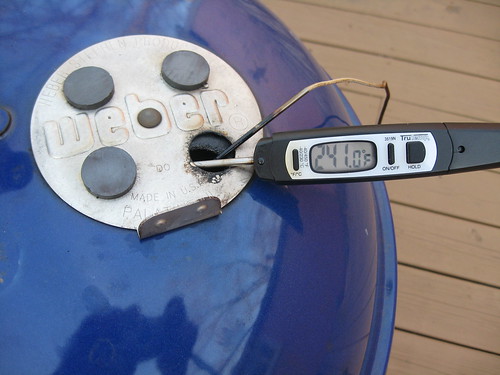
In this shot, I'm using magnets to shut down 3/4 of the top vent. Tonight, we eat. Anyone know best internal for brisket?
3.22.2009
Action shot
3.17.2009
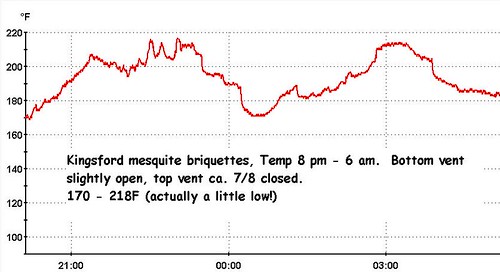
Weber kettle mini minion method temperature profile for long burn
UPDATED with lots more tedious graphs!
While a scientist in industry, my toughest challenge was doing a control experiment. Receiving a procedure for development, the immediate urge is to read through it and start tweaking and changing immediately. That urge continues to this day. It's more exciting to try to improve things than start with a baseline/control.
I'll dispense with tedious details, but I've never done the mini minion method properly. Finally, I did. I've been wanting to let my kettle go overnight forever.
It's better to start these long cooking sessions the night before dinner. If started in the morning, cooking time can run short. If the meat's done a couple hours early, just wrap it up and no problems.
Here's few clean control runs.
1. The top image is a simple indirect setup; briquettes banked against the side using bricks to keep them in place.
2. The second image is the temperature profile using Kingsford's mesquite briquettes. I'm able to achieve a steady 200+ temp with a max around 320°F (acceptable) for 7 straight hours using only about 40 briquettes. Nice. No waking up at 3 am if I start at 11. Kettle has slightly opened vents on the bottom and half open vent on top.
3. The next is a run with nearly identical conditions to #2 but using "natural" Kingsford Competition briquettes. A tad less residual ash, but nearly identical temperature profile.
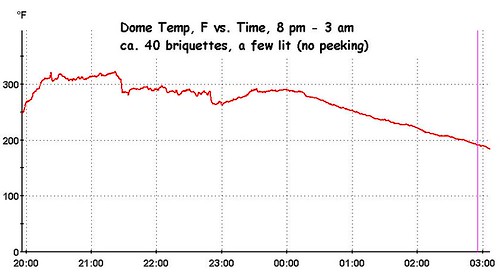
4. The 4th image shows one more run using a nearly closed top vent, everything else the same. This is pretty fascinating (to me). I've always had a hard time maintaining LOW temps with the kettle. In this case a relatively steady and controlled 195 ± 20°F is maintained for 10 straight hours using only about 40 briquettes. For low 'n slow, I actually need the top vent opened somewhere in between. That run will commence Saturday night when I cook beans beneath the brisket.
Sunday night's dinner will be a celebration of these efforts.
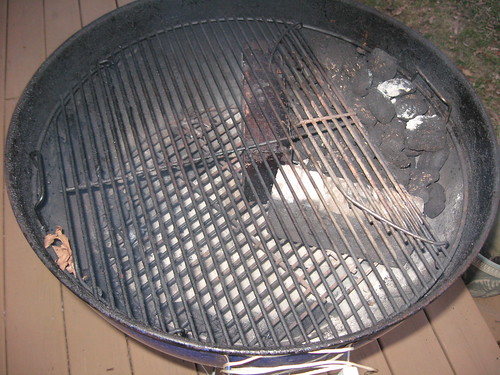
My standard indirect setup
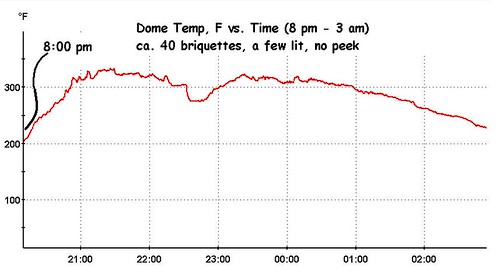
About 40 Kingsford mesquite briquettes, a few lit, ca. 7 hr. burn
This run is with Kingsford Competition Briquettes, same conditions overnight
Another run with the top vent shut down more.
This run has an expanded Y-axis, temp was actually pretty stable over time.

3.15.2009
Wort aeration with paint mixer.
Frankie helps film my wort aeration method (vid is a tad shaky). I made a brown ale today. $7 for just the hops. Ouch. Economy is bad.
3.13.2009
Eating these, I grossed out my 5-year old

I've been reading SproutPeople.com lately. Very cool site to buy sprouting gear. They also give plenty of information to sprout using a common glass jar too. I made these mung bean sprouts starting last Sunday night. I sampled a few sprouts every day and I'm afraid I halted the sprouting process a bit too late.
From day 1 through 3, they were more sweet. I grew them one more day and they were still good, but just lost some sweetness. They're really tasty and great for midday snacks (almost as good as Cheeze Its from the vending machine).
Give sprouting a shot. Any legume or grain will do. I'm currently working on lentils (a mix) and garbanzo sprouts. Mung were good though. I'll be doing them again.
3.10.2009
Perforated Al° SHEET, nice run.
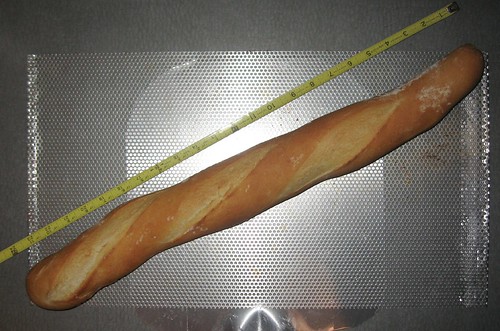
In my previous post, I discussed my new perforated aluminum sheet as an attempt to get my baguette closer to an authentic baguette's specifications.
Here's my first attempt. Using the diagonal of the sheet, I was able to get 24" and 400 g (a real baguette is minimum 30" and 250 grams, so it's way off, but closer). It looks nice despite the vents on top not being quite right.
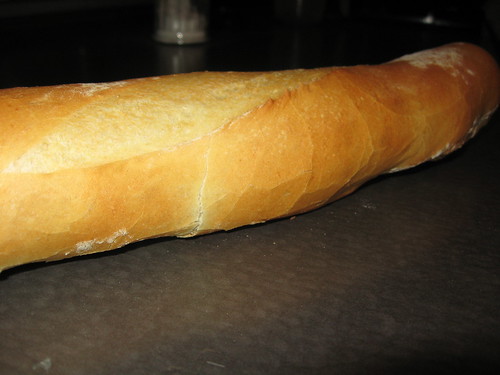
Check along the crust too, the characteristic crackled mosaic-like crust is spot on. Lots of surface exposed on this. Looking forward to breakfast.
Some notes to readers and myself:
1. The baguette pan need not be in the scooped shape, the flat sheet still makes the loaf pop (oven spring) when it hits the oven. I always suspected this was because of the steam getting through the perforations in the sheet. I'm more convinced this is the reason now.
2. I look forward to making a killer sheet pizza using this. No shoving the thing on and off a peel.
3. The sheet stores better than any pan I have.
3.09.2009
Perforated Al°

I can't find the reference, but I read somewhere the specifications for a baguette include a weight (around 300 g) and a length around 30". The baguette shape maximizes the ratio of surface to volume, thus achieving maximum crust on a loaf. What adults like and kids don't (we toss 'em the middles).
Most 30" wide ovens have an available width of 22". Most baking sheets are only 15". While I could cook on the hypotenuse to get my full 30" baguette, it'd be a pain. However, if I could find a pan, I could easily get the 22" length. A great improvement over the standard sheet/baguette pan.
I was searching Amazon the other day and actually found items listed under "perforated aluminum." I bought a sheet of 12x24". Didn't know if the holes were the right size or if it was too thick, just took a chance, $12 + $7 shipping. I got it today and it's kind of thin, but has adequate stiffness to serve as a nice pan. The holes are about the same size as my baguette pan. I crimped the edges to shorten it a couple inches so it'd fit in my oven. I could easily cook a couple loaves side by side.
I'm giving it a use test tonight. I have a 500 g (pre-baked) piece of dough and it'll be out tonight. Can't wait.
3.08.2009
Can I get a simple breakfast in Columbus that's healthy and inexpensive?
 This morning I was puzzled by what to serve for breakfast. Tired of cereal and we've eaten out too much lately. I went shopping around 6 this morning, just in time to get the usual shitty choice of Giant Eagle produce. Wanting to stay close to home to get the food backfired again.
Trying to make the best of it, I got some strawberries, d'anjou pears and a few bananas; standard year 'round choices. We also had some Mrs. Davesbeer's famous cinnabon rolls - much better than the real thing. In a few minutes I had diced up the strawberries and sweetened them with a trace of sugar, soaked the sliced pears in a bit of acidulated, sweetened water to keep them crisp and bright, tossed a few small banana slices in and some grapes. A nice balance for our decadent treat of the cinnamon roll.
Pretty mediocre meal but nice, simple and really inexpensive. So, my question is, Why can't I find anything like this in Columbus? Northstar has wonderful food, but a light meal for 3 is about $20-$30. Clearly for the child-free or 150-200K demographic. Other establishments give toxic fruit servings stinging with citric acid saturation and days old or, if it's fresh, a couple crappy pieces of greenish melon - yeah, that's Panera's $3.50 "fruit" cup. I don't hate the standard fatty b'fast fare. I like it too much. I just can't figure out why we can't get something like what I served inexpensively.
Please leave any tips in the comments - thanks.
2.23.2009
Whitebread

I visited my mother last week. At one point, she asked if I could make a whitebread. Hmmm, pretty much dedicated most of my adult baking life trying to perfect a razor-crust on a lean dough baguette, but, sure, I guess I could whip up a simple 'merican style loaf.
One trick to a good bread cooked in a loaf pan is getting the blob of dough in the correct size loaf pan. I made approx. a 500 g dough and used a 1.5 L glass loaf dish (I think this is a standard 9x4 loaf pan, but the dish was stamped with a "1.5l" on the bottom).
Anyway, here's the recipe:
water, 200 mL (could've used milk), warm (ca. 90°F)
butter, softened, ca. 2 T
sugar, 2 T
salt, 1 t
flour, 2C
active (not instant active) yeast, 1 packet (2 1/4 t)
Add everything into a bowl and stir until a shaggy mass is formed. Dump onto counter and knead about 5 minutes. Let rise and hour or so, degas (squish it) and let rest 15 minutes, form into loaf and plunk down into buttered glass loaf pan, let rise covered (I use a slightly moist paper towel) until just bulging over the top of the loaf dish, cook in preheated 425°F oven for about 20 minutes.
Wait until cool to slice. Make grilled cheese sandwiches with it.
2.06.2009
Pot Roast (desperation dinner deluxe)
Take note of this one busy parents!
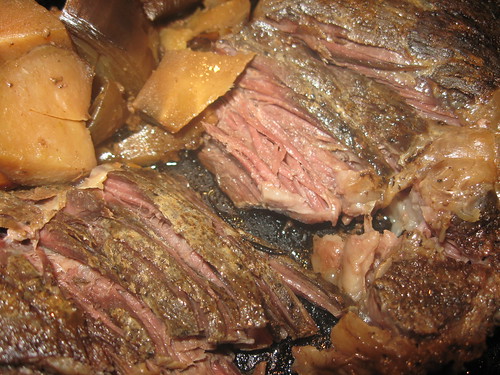
The other night I bought a "pot roast" (presumably, some cut of chuck) on the recommendation of the enthusiastic butcher at Kroger. Well-marbled, about $8 for a 2-3 pound piece. Last night, I dragged out a cast iron skillet and put the semi-frozen slab in, filled the pan (sides and on top of the meat) with chopped veggies: potatos, carrots, turnips, onion, a little garlic, a sprinkle of salt, big sprig of rosemary and a small squirt of oil. I tossed it in a 220°F oven from 8 pm to 6 am.
The aroma wafting through the house caused the dog to wake up several times. This morning, I removed it and let it sit. In the interest of quality assurance and protecting my family, I selflessly lunged at a morsel of the fork tender succulence. I almost portioned it out for breakfast.
Interestingly, the roots were not overcooked, still relatively firm. Took 10 minutes to toss together and will take a few minutes to warm and we will eat well tonight.
Slow cooking is the way to cook these inexpensive cuts - Thanks Wolfert (and Andrew for telling me of her book.)
My only complaint on this is the roots cooked near perfectly, BUT, they and the meat looked all the same color. Visually, the meal wasn't very appealing. We served it with a few crisp raw veggies to up the color. In the future, I'd add the veggies later in the cooking to retain their color. Aside from that, it was an amazing meal.
2.03.2009
Turkey Meatballs (a rewritten post from 2004)
Ever since Frankie was a teeny, tiny baby, she liked turkey meatballs. We make them often but I've learned a lot since I first started making them and they're better than ever. I decided to rewrite the post.
The significant observations that have guided my new, almost finished, master recipe for Turkey Meatballs are ...
• Grind (size) is crucial. Andrew has guided me in the craft of Charcuterie and recommends a coarse grind in most sausage preparations (kielbasa, sausage, etc.); his guess is the more coarse the grind, the less likely it is to dry out during cooking. I think he's spot-on; the few sausage preps I've done have come out exceptional. Just as significant, the coarseness of the grind contributes greatly to mouthfeel. There's an Ohio brand of ground turkey sold frozen that is ground really fine. It tastes mealy when cooked. When I bought some coarsely ground 93/7 turkey the other day it was infinitely better when cooked in this recipe. A coarse grind definitely wins. Thanks for the tip Andrew.
• When I was buying that super fine grind stuff, not knowing any better, I changed the mouthfeel by adding cracked wheat or bulgur. Far from a new method, cracked wheat has been added to ground lamb in kibbe forever, but it's not commonly used in combination with ground turkey. The cracked wheat made that turkey taste good. Don't worry, the hard nuggets of grain hydrate and soften in the mixture and upon cooking. There is no discernible taste or texture of the wheat. And, it's whole grain causing the meatball to be a pretty darn complete meal with protein, complex carbs and some fat all in one tasty little nugget of goodness.
• Like any meatball (traditionally sirloin), don't handle the thing much. Compress these things together as gingerly as a biscuit. Too much man-handling and it's gonna be tough.
• Future directions. Soon, I'd like to grind my own turkey thighs. It should be outstanding - another post.
That's it. Here's the recipe. I make them, freeze them on a cookie sheet and the next morning put them in a ziploc bag for cooking in tomato sauce (I don't fry meatballs, I cook them slowly in tomato sauce - any other method is just wrong).
Turkey Meatballs
Put the following in a bowl
Coarse ground turkey, 1 lb, highest fat content you can find
cracked wheat or bulgur, 1/2 C
bread crumbs, fine, 1/4 C
milk, 1/4 C
finely minced onion, 1/4 C
a few fine slivers of garlic
reggiano, 1/4 C (optional)
eggs, 2
oregano, dried, 2 T
salt, 1 t (I almost always salt 1% by weight, here, 5 g / 500 grams ingredients)
pepper, to taste
Put everything in a bowl, using your hands, gently fold everything together without working it too much. Form into whatever size meatball you like (we like golf ball sized). That's it.
I may modify quantities of cracked wheat and bread crumbs as I remake them. Toss a few frozen ones in tomato sauce and let simmer gently an hour or so. You'll eat the leftovers for breakfast.

![]() 3
comments
Labels:
Charcuterie,
Meatball,
Tomato sauce,
Turkey,
Wheat
3
comments
Labels:
Charcuterie,
Meatball,
Tomato sauce,
Turkey,
Wheat
2.01.2009
Chicken n Aubergine
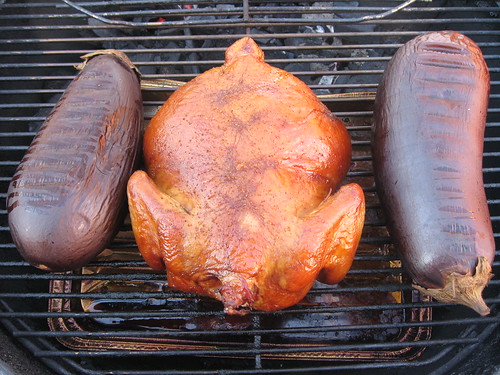
I was up this morning around 6 to go out for a quick coffee and remind myself a game of Candyland is more important than surfing the net.
I started the briquettes plus some hickory with a torch and let it rip during the morning. Dome temp around 250-275 in my kettle and the results look great.
Chicken was simply stuffed with rosemary and bay leaves and seasoned with s+p, eggplants were punctured once. Later today I'll turn it into a nice mild smokey baba ghanouj. Two dinners down.
1.26.2009
The next logical step after Twinkies ... corn dogs.
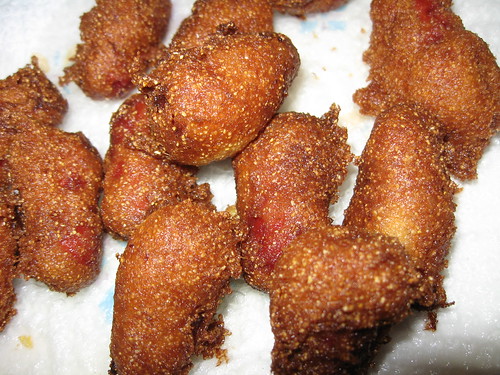
mmmm...grease
Never made them before. I winged it. Bought some mini beef dogs (yum, a snack for me during prep time) and a box of Jiffy corn muffin mix. I mixed the corn muffin mix using a bit more milk than the box called for to make the batter a bit more wet, dipped the dogs in and tossed them in soy oil (ca. 365°F) and fried them about 40 seconds each. They were devoured quickly.
They didn't look like the golden and thickly breaded corn dogs found at the State Fair, but they sufficed. The kids made these delicacies into a meal with Kraft Mac 'n Cheese and steamed broccoli. Yeah, haute cuisine in our home.
1.21.2009
Twinkies, a masterful assembly of carbohydrates (and soy)

Admit it, you want one
Twinkie, Deconstructed is a book by food science writer Steve Ettlinger. I wanted to read this for a variety of reasons:
1. I have an unusual relationship with carbohydrates; it's too odd to describe, a professional interest.
2. The soft squishy texture ubiquitous in classic American baked goodies has always intriqued me. I bake lots of bread and was looking for a trade-secret type of hint to give my breads better shelf life without sacrificing taste (haven't found it yet).
3. Food labels are overwhelming mysterious lists, e.g., on the Twinkie label is listed dextrose and glucose - these are identical molecular entities, but, because of labeling regulations, these synonyms are both required.
I've never been able to give a good book report, but I will say, after reading about half of the book, I've learned tons. The book's not a fast read and it's not funny as the title might indicate; it's serious food science, but it has enabled me to read and understand most of that label. I don't often finish books, but if I finish this, I'm rewarding myself with a couple soft squishy yummy nuggets of goodness.
I just hope they don't turn stale before I get to them; the expiry is 29-Jan-09 (ha, ha, ha - yeah right).
1.18.2009
My new bbq tool
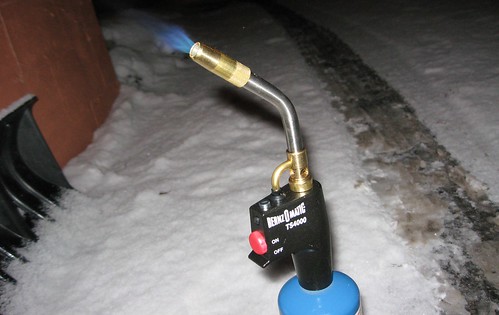
I use a chimney to ignite fuel for my kettle. But, living in a heavily wooded area, I don't like using paper to light it. Too many drifting embers from the lit paper.
So, I opted for this. Now I can caramelize crème brulée and then weld the ramekin to my grill.
My pork shoulder and turkey thighs have been smoking since 7 a.m. today. It's for the babysitter while we go to the Studio 35 beer tasting tonight!
Subscribe to:
Posts (Atom)


