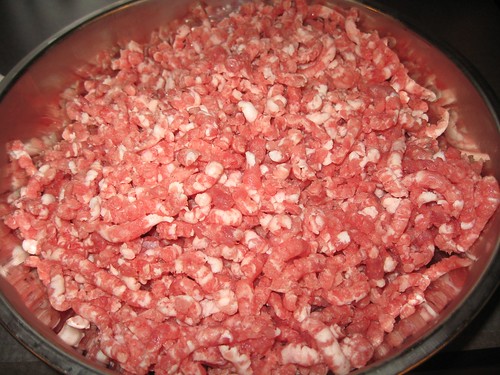
pork butt from Weilands, ground using a coarse die
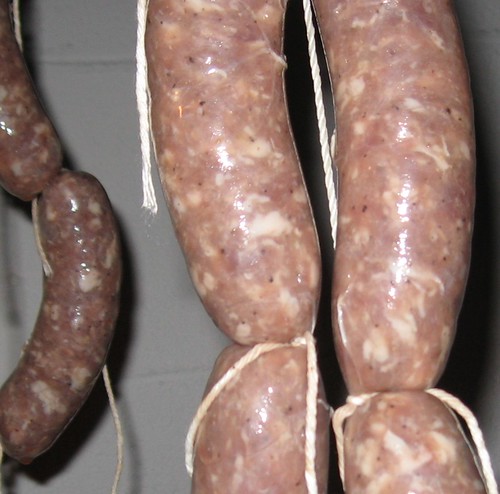
seasoned, stuffed and pierced for drying
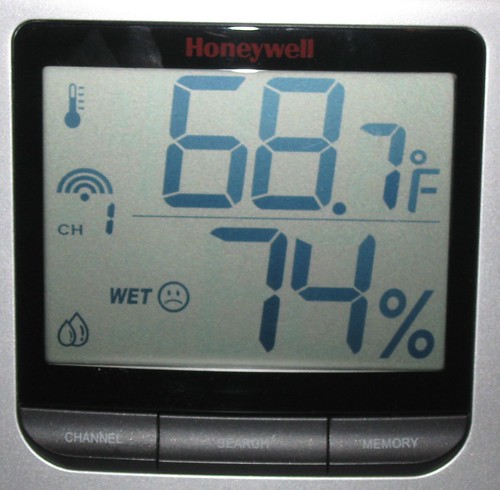
basement conditions, don't know why icon man is so sad
3 weeks 'til dinner
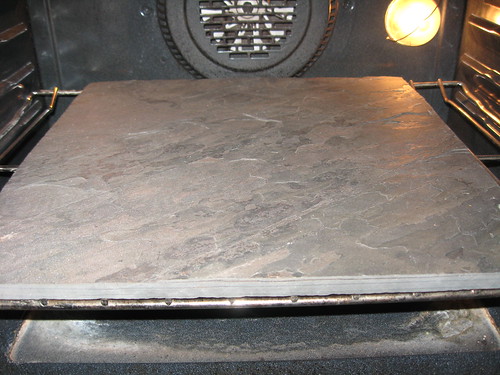
Having destroyed all my terra cotta tiles over the years, I decided to try a slab of slate to cook on. It's an unfinished sample I got at Lowe's yesterday for $10. Currently taking it through temperature cycles to see if it holds up. So far, I can see the layers on the side slightly separating. If it gets to some static state, it should be fine. If it continues to separate, it's back to the terra cotta.
I'm not dead, life is busy. Go to the ECJ post for an entertaining discussion.
Been so busy, I just found two old cellphones wrapped in a plastic bag in the downstairs freezer. I have no idea why they're there. That's how busy we've been. But, dinner must get to the table. Some nifty quickies we've been enjoying. Just wanted to share:
• Black Bean Hummous 15 oz can black beans (undrained), tahini (1/4 C), salt (1t) olive oil (2T), ground cumin, salt (1 t), lemon juice (1 lemon), pepper, dry oregano, garlic (1 clove crushed) - processed and let sit in fridge for an hour, served with drizzle of oil with pita and fresh veggies.
• Salmon big salmon fillet (ca. 1.5 - 2 lb), skin side down on baking sheet, top coated with slather of greek yogurt (1 C), Dijon mustard (1 T), fresh dill (2-3 T), s&p, baked at 400°F for 20 min, let rest. Served with steamed new potatoes and salad.
• Brisket Chilli leftover smoked brisket (ca. 3/4 lb, diced), black-eyed peas (15 oz can, undrained), kidney beans (15 oz can, undrained), canned tomatoes (ca. 15 oz), chili powder (whatever you got), onion, garlic, paprika, s&p, etc. Simmer an hour or so. Served with really good quality corn chips.
• Brown Rice and Beans Not a mistake. This is amazing. Preheat oven to 350, saute in ovenproof 3.5 qt with tight lid (I use cast iron dutch oven) onions, garlic in olive oil, add 1.5 C brown rice, saute rice a bit, add 3 1/3 C water or stock, 1 can black beans, fresh ground cumin, salt and pepper and bring to simmer. Place lid on and put in oven for an hour. Remove, let rest and dig in. Serve with lime wedges.
Life has been going too fast, but we're still eating well. And, the phones are still in the freezer.
Hit a snag recently. My breads have been lacking oven-spring. I watched my own vids to try to figure it out. Pretty sure I have it nailed. I'll be doing a nifty cumulative bread vid soon.
In the meantime, yogurt/dill slathered salmon is in the oven with smashed potatoes and salad for Mother's day (thanks Martha), for the only one who will tolerate my neuroticism. Happy Mother's day my love and to you Mom.
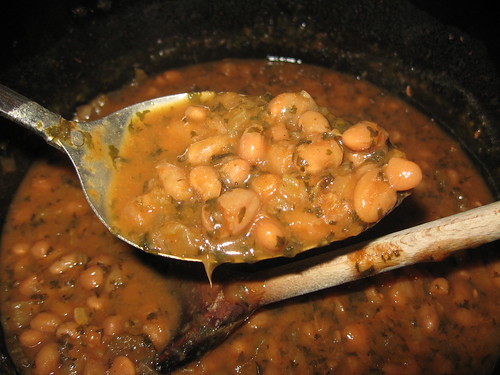
In a pinch, we eat Bush's Baked Beans. Not bad, but I hate the fact they're fat free. Fat free means they unnaturally remove the fat and add a shitload of sweeteners to get the right characteristics. In the process, they make a calorically-dense bean because they want to claim fat free. Bush underestimates the consumer.
Beans need fat. And, they shouldn't be as sweet as candy. I made a small batch for (hot)dog night a few days ago. Pretty easy.
Ever since Andrew told me of Paula Wolfert's Slow Mediterranean Kitchen, I've used my oven @ 200F overnight as a slow cooker. Ovens are so well insulated, it barely kicks on to maintain 200F. I used this to make my most delectable baked beans the other night and they were yummy.
Baked beans:
Cook a couple strips of bacon slowly (in ovenproof cookware) to render the fat. Eat bacon and drift into a momentary haze of ecstasy. In the hot fat, saute onion, pepper and celery, dump in 1/2 pound great northerns dry, add parsley, dry mustard, brown sugar, worcestershire (did I spell it right?), salt (ca. 2 t), pepper, ketchup and place in 200F oven for about 10 hours. Toss in fridge the next morning and reheat while dogs are cooking. Serve.
This preparation is ideal eaten near room temperature. Not too sweet or tangy. Vary quantities of ingredients to suit your taste.
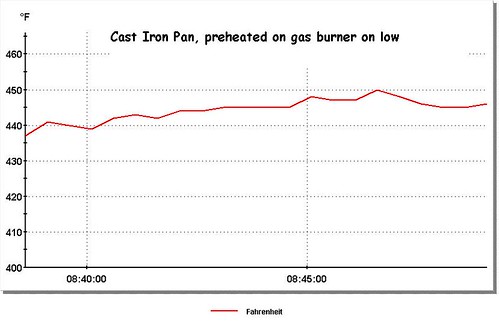
When I cook bacon, I alter the (gas) burner real low so the bacon slowly renders its fat, becomes nice and crispy and the fat doesn't splatter all over the stove. It's a slow process that recently made me think about the heat source.
I've often wondered if a pan goes on a burner, does it constantly go up in temperature, or does it level off? Given that ignited natural gas must be over a 1,000F or so, I wondered what temp a skillet would get at vaious levels of gas on the burner.
I fired up a cast iron skillet and sandwiched a thermocouple probe on the surface with another smaller skillet to hold it securely on the surface. After a long pre-heating at a setting of 3 out of 8 on a 10K BTU burner, I was amazed at the stability of the temperature. The y-axis is expanded quite a bit and the duration of this brief, but not trivially short, test is over 10 minutes.
Seems kind of trivial once the data's in, but I couldn't figure it out before doing the expt.
This post should make my last 5 readers run for another blog.
The baguette has been a significant focus in my life for literally decades. It serves us not only as a daily bread, but is more about community. Food to share - with friends and family. The "recipe" for it is the motivation for this site. There are no bread recipes as far as I'm concerned. Bread, while it may only take a few minutes to toss together, is not a recipe, it's a way of life.
Enough of the philosophical, just had to justify another in an infinite series of posts on my obsession.
The baguette plays out in 3 acts. All 3 change gradually over time as experience is accrued. Currently, I'm concerned with modifications to act 3. The humidity applied during baking. After talking to Andrew last night, we feel the initial humidity as gleaned from the early pages of Reinhart's Baker's Apprenctice is more critical than we may have thought.
I've routinely humidified my preheated electric oven with 1 cup water tossed in at the beginning and occasionally, I dabbled in moistening the exterior of the loaf itself. I'm in the process of configuring alternative conditions. I'm now trying the baking in the lower third of the oven (as usual), beneath the perforated aluminum baking sheet is a half sheet baking pan with 1 cup of water (placed in it a couple minutes before baking) and the sides of the oven doused with a stream of water just as the loaf goes in. Too much for words, this will show up in a future video if it works. Thanks for the talk last night Andrew. Someday we'll get that voluminous, airy inside, razor-sharp crusted baguette.
And the first act video? Soon, I promise. It's the only act that never changes.
ps, According toWikipedia and the formula for volume of a cylinder, the density of a French baguette should be 10 mL/g (that is not a mistake, typically density is given in units of g/mL, but the inverted dimension is a more useful metric). My loaves this morning were about 4.4 mL/g - loooong way to go. I think I actually created an environment that was too humid!! Very useful though. Going in the wrong direction for volume is useful too.
Some weeknight, I'm going to make a 12" pizza with nice bubbles and a beautiful airy crust. If you want to follow along, put 2 cups flour, 1 cup water, 1/2 t dry yeast (any kind) and 1 t salt (regular or 1.5 t kosher) in a container, mix into a ball, don't bother kneading and toss in the fridge until about Tuesday night. It's gonna be awesome.
Update
I filmed the entire thing and the final pizza was too moist inside. The slack dough was simply too wet. Even cooking in an amply preheated 550-deg-F oven, it was still under done in the middle despite the nice bubbles on top.
I'm posting the vid because the method will be identical and I'll simply replace the dough recipe. Sorry for wasting your flour all. Agony of defeat hurts. If you feel like losing 8 minutes of your life you will never, ever get back, here it is.

The quick version of my kettle long slow burn solution:
1. bunch of briquettes banked on the side for indirect
2. light a few on top (I use a propane torch)
3. bottom vent barely open
4. top vent ca. 1/4 open
=> For 40 or so briquettes, easily 7-10 hours
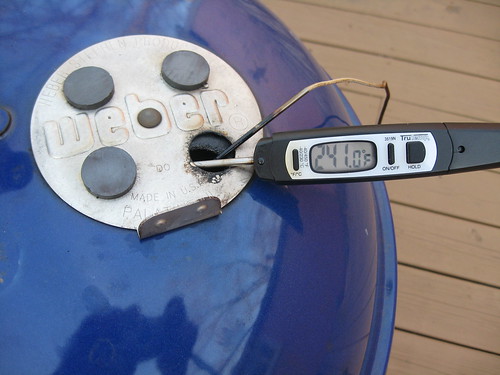
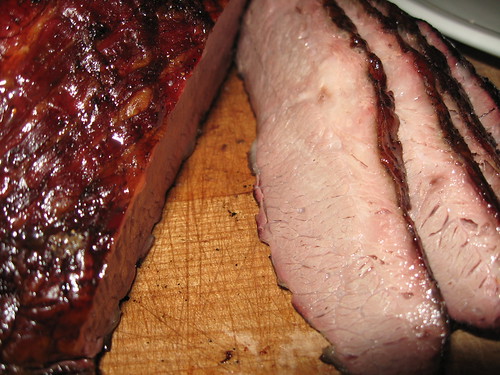
In this shot, I'm using magnets to shut down 3/4 of the top vent. Tonight, we eat. Anyone know best internal for brisket?
While a scientist in industry, my toughest challenge was doing a control experiment. Receiving a procedure for development, the immediate urge is to read through it and start tweaking and changing immediately. That urge continues to this day. It's more exciting to try to improve things than start with a baseline/control.
I'll dispense with tedious details, but I've never done the mini minion method properly. Finally, I did. I've been wanting to let my kettle go overnight forever.
It's better to start these long cooking sessions the night before dinner. If started in the morning, cooking time can run short. If the meat's done a couple hours early, just wrap it up and no problems.
Here's few clean control runs.
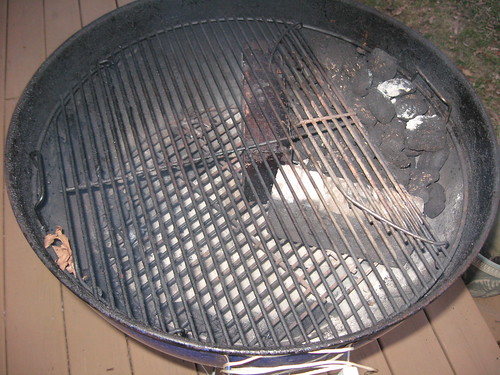
1. The top image is a simple indirect setup; briquettes banked against the side using bricks to keep them in place.
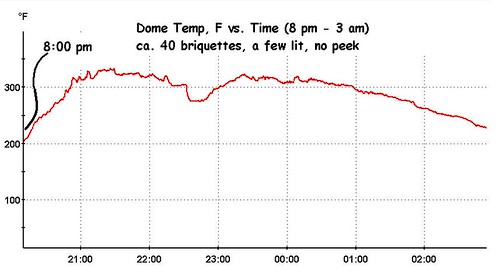
2. The second image is the temperature profile using Kingsford's mesquite briquettes. I'm able to achieve a steady 200+ temp with a max around 320°F (acceptable) for 7 straight hours using only about 40 briquettes. Nice. No waking up at 3 am if I start at 11. Kettle has slightly opened vents on the bottom and half open vent on top.
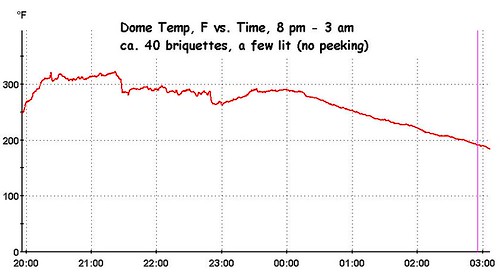
3. The next is a run with nearly identical conditions to #2 but using "natural" Kingsford Competition briquettes. A tad less residual ash, but nearly identical temperature profile.
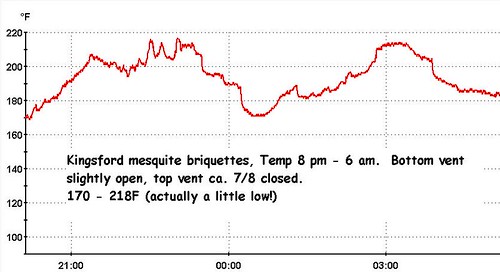
4. The 4th image shows one more run using a nearly closed top vent, everything else the same. This is pretty fascinating (to me). I've always had a hard time maintaining LOW temps with the kettle. In this case a relatively steady and controlled 195 ± 20°F is maintained for 10 straight hours using only about 40 briquettes. For low 'n slow, I actually need the top vent opened somewhere in between. That run will commence Saturday night when I cook beans beneath the brisket.
Sunday night's dinner will be a celebration of these efforts.

I've been reading SproutPeople.com lately. Very cool site to buy sprouting gear. They also give plenty of information to sprout using a common glass jar too. I made these mung bean sprouts starting last Sunday night. I sampled a few sprouts every day and I'm afraid I halted the sprouting process a bit too late.
From day 1 through 3, they were more sweet. I grew them one more day and they were still good, but just lost some sweetness. They're really tasty and great for midday snacks (almost as good as Cheeze Its from the vending machine).
Give sprouting a shot. Any legume or grain will do. I'm currently working on lentils (a mix) and garbanzo sprouts. Mung were good though. I'll be doing them again.