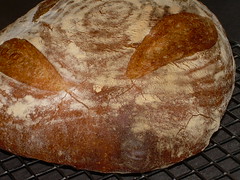
 In yesterday's post, I babbled about the opportunity to use of this nifty new pan and bannetton I was using to bake a boule with nice volume and crackly crust.
Although, my recipe was only a quick rise dough, the results were very nice. The crust, initially was crackly and the interior tender; after cooling, because it was slightly enriched (with olive oil and honey), the crust became softer but still maintained some tooth.
The real victory of the day came using these tools and this kneadless process. I've been somewhat obsessed ever since I watched this video and I had an amazing success story yesterday. When I get reproducibility on it, you'll be the first I tell. I used the recipe, but my own cooking method.
1.14.2007
The Results
![]() 2
comments
Labels:
baking methodology,
bread
2
comments
Labels:
baking methodology,
bread
1.13.2007
On humidity, perforation and the Brotform
It's about frigging time for a new post. Giada's nuts was a good chuckle, but it's time to move on.
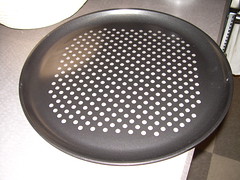
Historically, I've had problems achieving good crackly crust on anything but my baguette. I think it's primarily an issue of humidity attacking the new loaf on all sides in the oven when the yeast is experiencing its final gasp of life (a.k.a. oven-spring). The perforated baguette pan simply allows the steam to hit the loaf from the bottom (and all other sides are simply exposed, so they get it too). Today's experiment involves the application of a perforated, thin, flat pan I found the other day at good 'ol Giant Eagle. ANY size loaf could fit on this thing and best of all, you don't need stones in the oven or a peel to get the loaf in and out. This thin pan, I hypothesize, should heat up quickly and permit my steam shot (ca. 60 - 120 mL water, tossed into the hot oven floor or squirted from a bottle) to completely bathe my loaf in steam, regardless of shape, producing a crackly mosaic of crust surrounding a tender inside (a.k.a. "Papa's good bread" Frankie calls it and I stand proud).
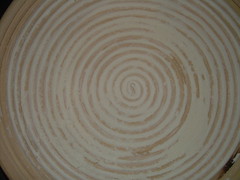
Additionally, since I'm making a boule today (a round bread), I'm using a nifty item my love bought for me a year ago called a Brotform (2nd image). It's a bamboo-like bowl used for the final proof. There's surprisingly little (I've found) on the web for using these. Do they need extensive seasoning/use? Is a slack dough going to stick? I'll be exploring these and other questions in weeks to come.
Today's recipe is not a good control. It's not the simple baguette recipe; there are a lot of variables tossed in. Life is simply too short for rigorous factorial experimental design everytime you need some bread. So phthththth. And, I need this for dinner at Amy and Mario's tonight!
My recipe for today is:
water, 250 g
honey, ca. 1 T
olive oil, 1 T
Montana Sapphire unbleached white, 375 g
rapid rise yeast (Fleischmann's), 1 packet
salt (not kosher), 7 g
First kneading and rise in the bread machine (my kitchen slave), 2nd rise will be about 20 minutes and the final proof somewhere around 20 minutes (cold kitchen today, we'll deal with the final proof when it comes). Baking will be at 450-deg-F (convection) until deep golden color. I'll post the results.
![]() 0
comments
Labels:
baking methodology,
bread,
gadgets
0
comments
Labels:
baking methodology,
bread,
gadgets
12.21.2006
Giada's Nuts
 It's been a rough year. Family tragedy followed by moving to a new house (not a home yet). The move's good, but stressful. The family tragedy? Well, things will hopefully get better over time. Don't know.
Just wanted to log this recipe for an unbelievable looking mixture of spiced nuts that, if they turn out well, will be gifts next year. And, I hope they're good because no one, with the exception of Frankie and Trish, got a thing this year. Sorry all.
Here's to 2007 being a better year.
11.27.2006
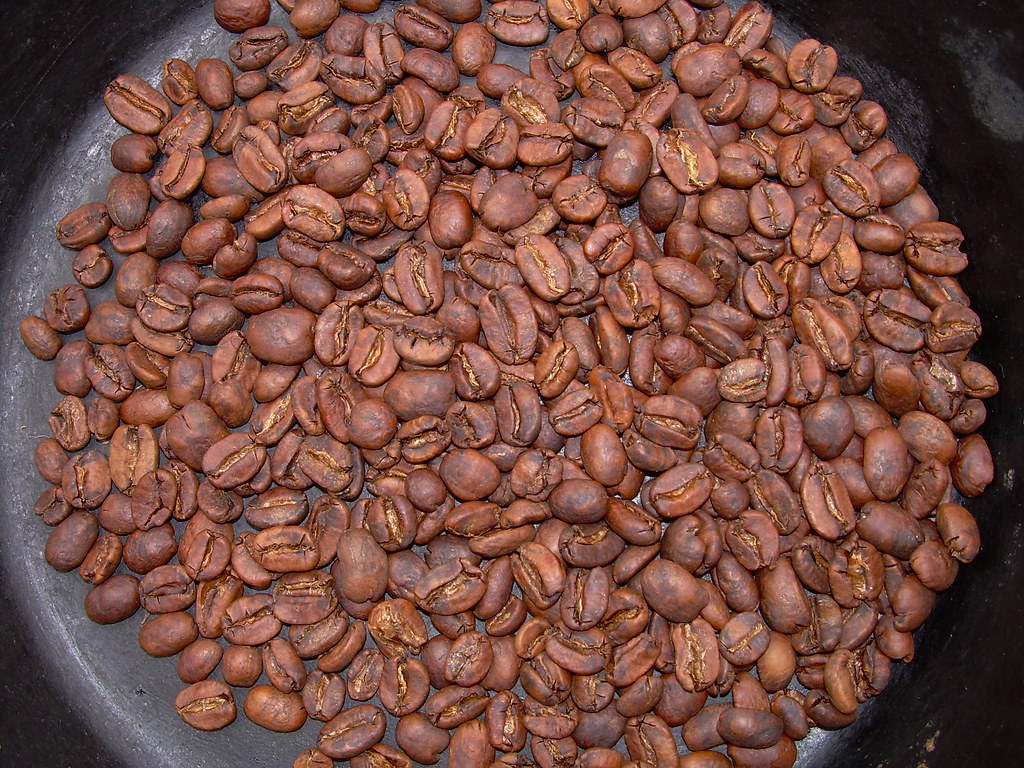
Coffee Roasting (expt 1)

I started roasting coffee recently. Click here for the larger size; very cool shot. Unfortunately, looks better than it tasted. I chose a Sumatra decaf green bean from Yeah, me too on Indianola (Columbus, OH) for starters. For roasting equipment I used an unmodified Hamilton Beach Poppery II (scored for $2.99 from Ebay) and roasted 1/2 cup of green beans for 10 minutes.
I conducted this outside at about 50 deg-F for a timed 10 minutes. Despite the satisfying color of the roasted beans, I think I under roasted them. After roasting them, I cooled them in a cast iron pan (to dissipate the residual heat; halting the roasting by removing residual heat is supposed to be effective) and waited a couple hours before grinding them for a cup of brew in my drip machine.
The final coffee had nice color, reasonable taste, but was a tad winey-tasting. I suspect they were a tad underdone. I also spoke to some friends about my results and they agreed the ambient outdoor temperature* was too low to get a good rich roast outside in only 10 minutes.
I'll be trying this again soon. It's fun, Frankie likes to watch and the final results are never wasted. I think I just need a more reliable endpoint to shoot for. The first crack was faint and barely detected and I don't even know if I made it to the second crack.
Results will be disclosed as experiments continue.
*I did this outside because of warnings from friends about big plumes of smoke when the beans start to achieve a dark roast. I never noticed this. Again, possibly indicative of too cold an environment to get the full roast.
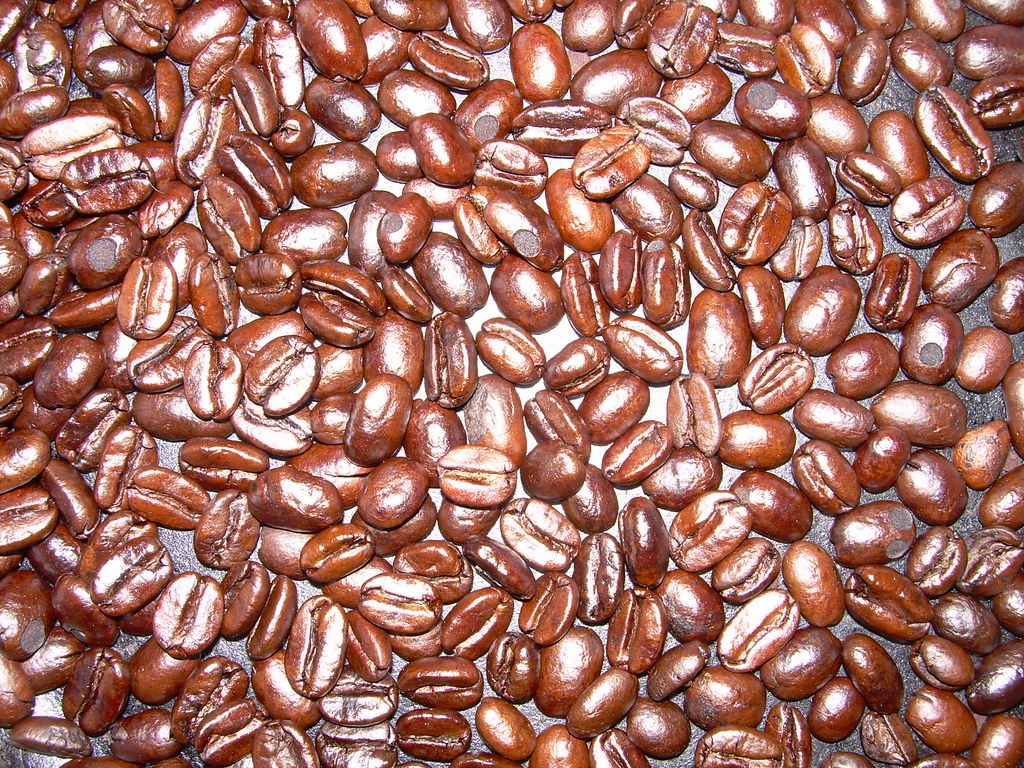
Update 08-Jan-07
I repeated the roasting indoors (ambient temp ca. 64-deg-F for a full 12 minutes. I was hearing the second crack when I stopped the roasting (first crack around 5-6 minutes). Dumped the batch (1/2 C) into cast iron and it was all shiny and dark. Here's the final product. Tasted as good as it looked.
![]() 0
comments
Labels:
coffee,
decaf,
roasting,
sumatra
0
comments
Labels:
coffee,
decaf,
roasting,
sumatra
11.11.2006
Come hither our victim
And subject it to a slow, mold-induced death.
Ideally, we'd like it to thrive indoors until spring and maybe even have some to harvest for our focaccias and roasted roots. But, we don't have good luck with these things. They generally look ok for a couple weeks. Inevitably, mold sets in and it's just a matter of time from that point.
So, if anyone has luck wintering these things, shoot me some advice via the comments. I'll keep you posted on its "progress". Currently, it's a week old and it has a surprising amount of new growth. I'm afraid to water it.
update
Time of death, early december.
11.07.2006
Pizzas: Kneadless Expts.
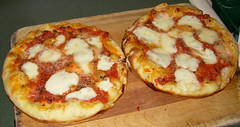
This night, I decided to take the same dough, divide it into two 250 g lumps and make pizzas out of it using 9" cake pans. My usual pizza prep involves fairly extensive kneading of the dough. But, I'm a wicked busy parent and looking for any possible way to get good food to the table in a shorter amount of time. I thought this expt. would be pretty fun too.
I made the dough as in the previous focaccia, post, divided it, plopped each lump into a 9" cake pan (dark, non stick), topped them with pureed tomatoes, oregano, good mozzarella, salt, pepper and tossed them in a 450-deg-F oven (middle) for 15 minutes.
Results
Crust was, like the focaccia, soft, not too chewy, cooked well all the way through (kind of a thick crust), and tasty but far, far from the robust crust of a well-kneaded dough.
My next foray into this kneadless stuff will be tonight when I apply the method to our night's baguette; a very lean dough (it's bread, cheese and salad night in our household). I'll post results.
Now vote, damnit.
11.02.2006
Roasting soon

The web will never cease to amaze me in it's breadth, but in every niche, there's a surprisingly limited vocabulary that's used. Almost everyone who does this sort of thing knows Sweet Maria's and also knows the Hamilton Beach Poppery II is one of the best hot air poppers to use as a primitive roaster and it does a darn good job. And, there's about a million people who've modified these things to fine tune the roasting process ... another post.
I also got a tip that in some way, the proprietor of the Columbus coffee shop Yeah, me too (on Indianola) is in someway related to Sweet Maria's and their beans pass muster with the best of them.
All I need now is a burr grinder and I'm ready for coffee heaven.
10.30.2006
Punk'in seeds
One of my favorite spices is ancho chili powder.
Anchos are nice and spicy but not hot. Perfect for good flavor but don't scare away Frankie. I use it making chilli, spicing up beans, etc. I usually buy the dried smoked chilis and cut out the white parts, remove the seeds and pulverize them in a spice blender. They keep forever. Once in a while, the particular lot I buy is still kind of moist and I'll have to dry them in the oven at about 170-deg-F for a couple hours.
So, last night, while the wife and kid were working on the jack 'o lantern, I grabbed the seeds and went to work. Cleaned them up, sprinkled them with ancho chili powder, salt, pepper and gave 'em a quick squirt of olive oil and baked them at 250-deg-F until crisp. Yum.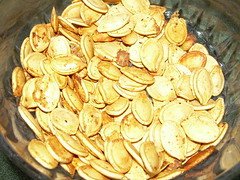
10.23.2006
Focaccia, kneadless
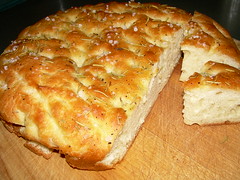 Sunday evening meal. Like to make it a special one. Sunday nights should be special. Everyone gearing up for the week. We were having italian sausages simmered for several hours in tomato sauce over pasta and we wanted some fresh bread (or as Frankie calls it: "Papa's good bread") to go with the meal, but after a long day of parenting, I was bushed.
I read a book a while back called No Need to Knead. Her basic premise is you get more rustic looking breads (big irregular holes and such) with less kneading. I don't think the premise is valid but it sure sounded appealing when I wanted a fresh loaf. So I weighed out water (200 g, warm tap), a T or so of honey, 1-2 t of dry yeast, olive oil (2 T) and swirled the mixture in my plastic bowl I use for raising dough. Then, I tossed in unbleached white flour (300 g) and salt (5 grams) and mixed the mixture with a metal spoon until it came together, and mixed another couple turns and closed it up (this container I use has a 2 mm diameter hole in the top for venting the gas) and went to wrestle Frankie.
Within an hour and a half, it had risen nicely. I sprinkled on some flour and squashed it down. It wasn't as sticky as I thought it would be. I let it rise a second time only about a half hour. Then I plopped the mass into a 10 inch dark, non-stick cake pan (oiled lightly) and preheated my oven to 450-deg-F.
I pushed the blob out to fill the pan, Frankie painted the surface with oil, I sprinkled rosemary and coarse sea salt on it and let it sit uncovered for 15 minutes. Then, I docked it and pushed it in the oven for 15 minutes. Wow. What a focaccia for very little work!
However, it was very soft. Very flavorful but very soft and chewy. A great bread but don't know if I'd like it as a staple in our repertoire of breads. Definitely fit the bill for an exhausted parent.
food foccacia baking kneading bread
10.09.2006
Chicken 'n Noodles (wicked fast)
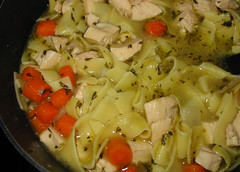 A neighbor of ours makes the absolute best chicken and noodles we have ever had the luxury of tasting. She makes her own noodles and even invited me to witness this stupendous dish being prepared. There's really no big secret. She made a tender noodle using flour, some oil, water, salt and hand rolled them. No biggie. The chicken soup was also nothing secretive. A good stock derived from a bone-in chicken, veggies, etc. I kept looking for the secret ingredient. She told me it was the Knorr's cube she used. No matter how hard I looked, I couldn't find anything unconventional that made her soup so special. I left after the tutorial. A few days later, we were talking about the soup again and she mentioned "oh yeah, and a stick of butter" (was added towards the end of cooking). Bingo.
She essentially "mounts" the soup with butter. I don't think this is mounting as it's usually used, but the end result is still decadent richness.
The other day while driving Frankie to school, she requested chicken 'n noodles for dinner. I thought, great, a weeknight and all I have is some frozen boneless chicken in the freezer and some dry noodles in the cupboard. Butter to the rescue and voila! A wonderful fast chicken and noodles in a flash was born. We use it pretty often now and is it yummy.
Quick Chicken and Noodles
onion, 1, chopped,
garlic, a few slivers
olive oil, about 1-2 T
carrots, a bunch, chopped
1-2 chicken breasts, frozen, boneless
water, ca. 2-2.5 quarts
parsley, dried, 1T
salt, 2t
pepper, to taste
oregano, dried, 2t
egg noodles, most brands are good, 1/2 lb, dried
butter, 3T
Saute onions, garlic, carrots a few minutes, toss in hunks of frozen chicken and water, parsley, salt, pepper and oregano; bring to a boil and simmer for about 30 minutes. Remove chicken and chop, return to pot. Drop in noodles and continue simmering 10-15 minutes. Finally, stir in butter and serve. The butter takes care of all your shortcuts (boneless breasts, no stock, etc.) and since we don't throw in gobs of it, it's not even that unhealthy since it yields at least 4 healthy servings. Enjoy.
food chicken+noodles soup comfort food
10.05.2006
Desperation Dinner #2 (in a long drawn out series)
 Over the years I've noticed the color of cookware can have a profound impact on the food. When baking, dark cookware darkens food more while bright aluminum sheets make it tough to darken the bottoms of cookies. Makes sense; absorbs more heat and transfers it to your food. I guess that's why my orange terra cotta tiles in the oven are so perfect for pizza. Browns the bottom at just the right rate so the top can brown at about the same rate.
When it comes to baking in a pan though, I prefer darker cookware. Cast iron is a favorite of mine but sometimes I just prefer something lighter. My second favorite bakeware is enamel on steel. The speckled stuff. Sturdy, cheap, perfect for roasting roots.
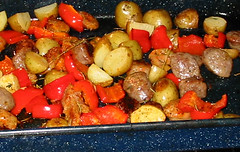
This meal, inspired by my Mom (who does this in clear glass most of the time, my least favorite bakeware) is the best. Everything gets a nice crust to it and cooks evenly. AND, it takes about 30 seconds to prep and about 40 minutes to bake (while I play with the kid). With that ramble in context: I chop frozen italian sausages, peppers and potatoes into about the same size cube (bit size), toss them into my enamel on steel pan, drizzle olive oil over it all, salt, pepper and rosemary, shake to distribute the oil and spices and bake at 400-deg-F for about 35-40 minutes. You can use any vegetable medley you please and it's a simple complete meal (as long as you're not a vegetarian).
food desperation dinner sausage cookware
9.13.2006
The Bomb
A couple weeks ago, I visited my parents and got my fill of the cleavage and nice hair channel FoodTV. Not in my own kitchen at the time, I could only jot down some notes on what I committed to do. Someday that is - after we move.
Not since Molly's waffles (Molly, I'm going to make these someday if it kills me!) have I seen a recipe so decadent. It's from a new guy who calls everything "the bomb". Some hipster term I don't have time to look up. I think it means something good.
He made pork carnitas and the thing that caught my eye was the way he prepared the pork. It was "the bomb". He took a boston butt, ca. 4-5 lbs, and cut it in four chunks. Then he deep fried it in Manteca (ca. 2-3 quarts; a kind of lard, pork-derived I think) heated to approximately 300-deg-F (I'm sure the temp went way below that with all that mass) in a cast iron skillet for about an HOUR. He took it out, let it rest and it pulled beautifully. I was salivating excessively. Before I die, I will cook a pork butt like this. Anyone ever tried this method?
food boston butt carnitas foodtv
7.27.2006
Hoummus b'Tahini
Hummus or however you spell it, is a staple in our house. It's popular with us because it tastes good, it's healthy and contains only a handful of ingredients.
It's also one of those mixtures that everyone seems to make with their own "special twist". This special twist scares me. Hummus, as far as I'm concerned, shouldn't have funny things in it (roasted red peppers, chilli powder, bludgeoned with garlic, etc.) and the amount of lemon juice is pretty critical too.
From '94 to '98 I did some federal time at the FDA. While there, an Egyptian friend of mine gave me Lebanese Cooking that has, what I consider to be, the authoritative source for the only hummus recipe we use. The recipe hydrates and cooks chickpeas from scratch - I don't. Aside from that, here's our version of this middle eastern classic. We serve it with a plate of fresh veggies, pita, pickles and a salad.
Don't worry Biggles, I'll be posting some meaty kibbeh recipes soon too.
Hummus
chickpeas, 2 cans, 14.5 oz with liquid
tahini, well-mixed, 120 grams (1/2 cup)
lemon juice (of 1 lemon, ca. 1/4 cup)
salt, 1/2 t
olive oil, 30 grams
garlic, 2-4 slivers
Process all ingredients until smooth adding additional water if necessary to achieve your desired consistency. I like it smooth and with the water from the canned chickpeas, it gets nice and smooth. Serve slightly chilled with a drizzle of olive oil and parsely (optional garnish).
7.16.2006
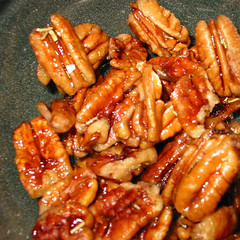
Rosemary-Infused, Sweetened, Roasted Pecans
 I think the best part of a restaurant salad are those cool sweetened pecans they top it with (although, the crumbled goat cheese is good too). The only problem with these is they're often a bit too sweet, candied. So, I made my own.
The other night, we were still detoxing from too many burgers eaten at a cookout. We had salads with some lentils on the side. Very satisfying. But, at the last minute, I had the urge for some slightly sweetened roasted pecans on the salad. This is how I made mine. Took about 5 minutes on the stovetop with a non stick pan. They were wonderful. Frankie loved them too.
Rosemary-Infused, Sweetened, Roasted Pecans
A handful of pecans (ca. 1/2 cup) were tossed into a non-stick fry pan on medium high heat with about a tablespoon of olive oil and a teaspoon of rosemary sprinkled over it all. Then, I sprinkled about a tablespoon of sugar over the mixture, continued heating and then poured about 3 tablespoons of water over the whole hot mixture. The water dissolved the sugar and suspended the rosemary. For the next few minutes I swirled the nuts in the hot solution letting the water evaporate. After the water was gone, I continued to heat the nuts for about 2-3 minutes and finally dumped them from the pan onto a wooden cutting board. When the sticky hot nuts cooled they were mildly candied and crisp. The rosemary was a fabulous touch. A friend of ours makes something similar but I forget her process. Thanks for the inspiration Amy!
Subscribe to:
Posts (Atom)


